2023 Software Updates
For our most recent software updates, please see What's New?
December 11, 2023 - First Home Savings Account (FHSA)
- 1
-
Enter First Home Savings Accounts in your projections
For clients saving towards a first home, the new FHSA can provide significant benefits. You can now model this account type in Snap to show your clients the advantages of the unique tax treatment for contributions to and qualifying withdrawals from this account.
Watch this 5-minute summary video of the new FHSA in Snap.
On the Scenario Setup -> Assets page, you can select FHSA in the Type column.
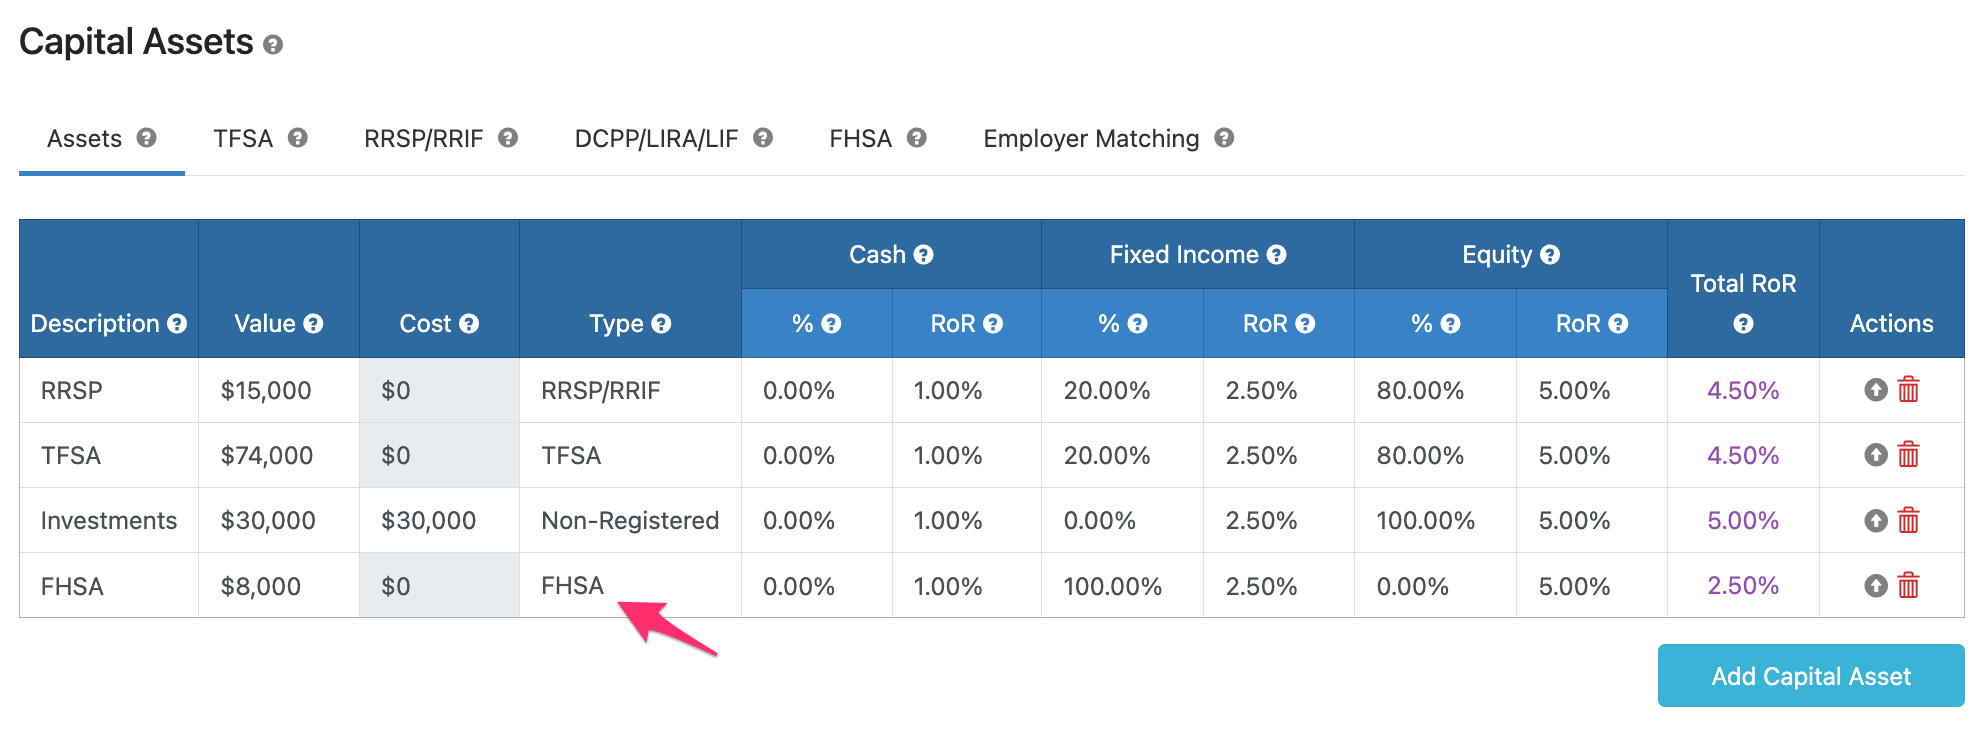
Once you've input the account information, you can use the FHSA tab to adjust the default settings that Snap uses to determine the available Contribution room for the FHSA each year of the projection.
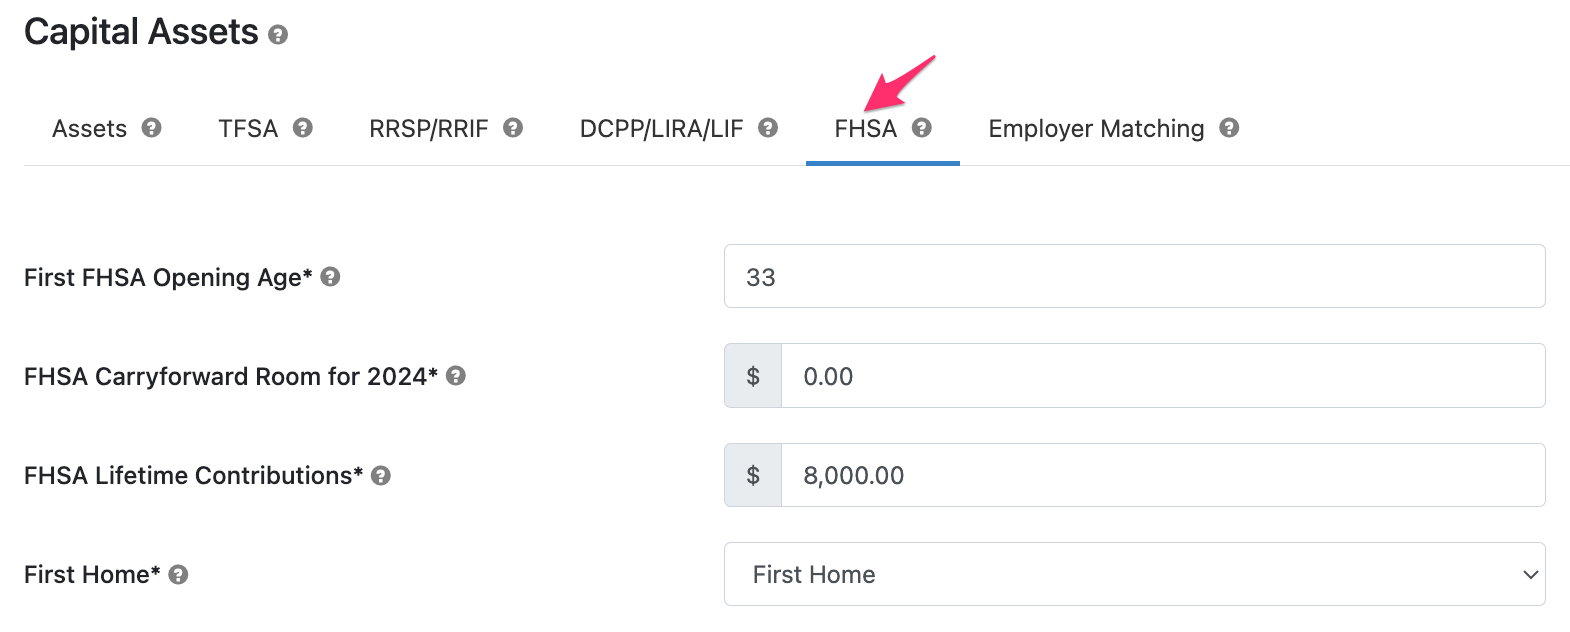
- There are several rules related to when a FHSA must be closed. The First FHSA Opening Age field allows us to determine the 15th anniversary to automatically close the account and distribute any remaining money.
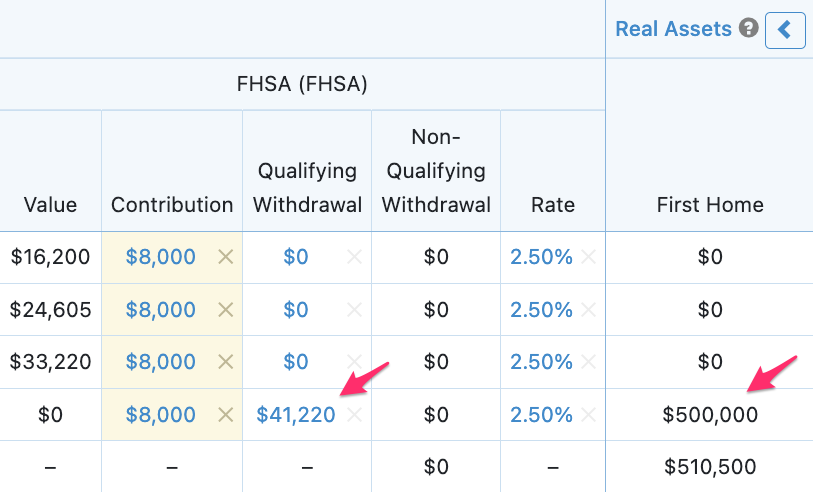
- The lifetime maximum contribution is $40,000. If the client has made contributions in previous years, you can input the total in the FHSA Lifetime Contributions field so that Snap can factor this into its calculations. You can view the assumed Contribution room available each year of the projection by hovering your mouse cursor over the Contribution value for the FHSA on the Planning page.

- If the client didn't contribute the maximum in a previous year that they were eligible to do so, up to $8,000 can be carried forward and entered in the FHSA Carryforward Room for 2024 field.
- If you're modelling the purchase of a first home in your projection, you can add the Real Asset with a Future Purchase Age and then select the Real Asset in the First Home dropdown. Snap will automatically make a Qualifying Withdrawal from the FHSA and apply it toward the cash flow required for the home purchase.
Our First Home Savings Account (FHSA) article has all of the additional details you may be interested in.
- 2
-
Updated Report Settings
We've released several customizable tools for Client Reports over the last year. The first was the ability to add Custom Pages to allow you to discuss additional topics in your client meetings and deliverables. The second most recent was the ability to create a Custom Order of the report pages.
To make it easier to discover and use these features, we just updated the layout for the Client Report -> Report Settings page.
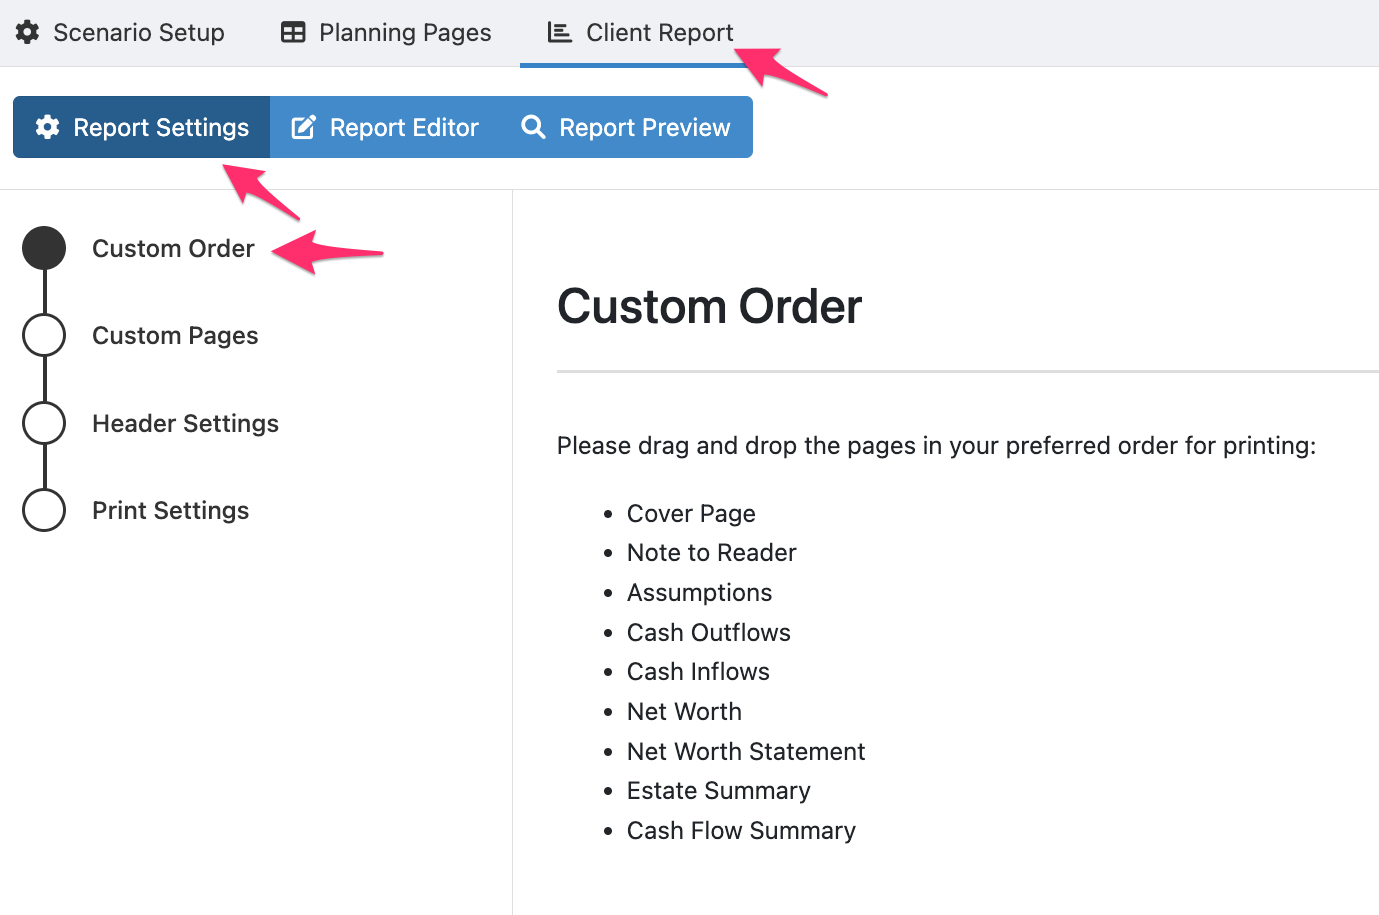
Similar to the Client Report -> Report Editor page, you can now select the relevant section that you'd like to use from the left navigation.
Our Report Settings article has all of the additional details you may be interested in.
November 20, 2023 - Reorder Client Report pages, Simplified Net Worth and Estate Summaries, Easily edit Base Expenses, and updated refer a friend
Highlights:
- Reorder Client Report pages
- Simplified Net Worth and Estate Summary tables
- Easily edit Base Expenses
- Updated refer a friend process
- 1
-
Reorder Client Report pages
One of our top feature requests has been to allow page reordering in the client report and we are very excited to say that it's now available. You can access the Custom Order feature under Report Settings, and then save your settings for all future scenarios if desired.
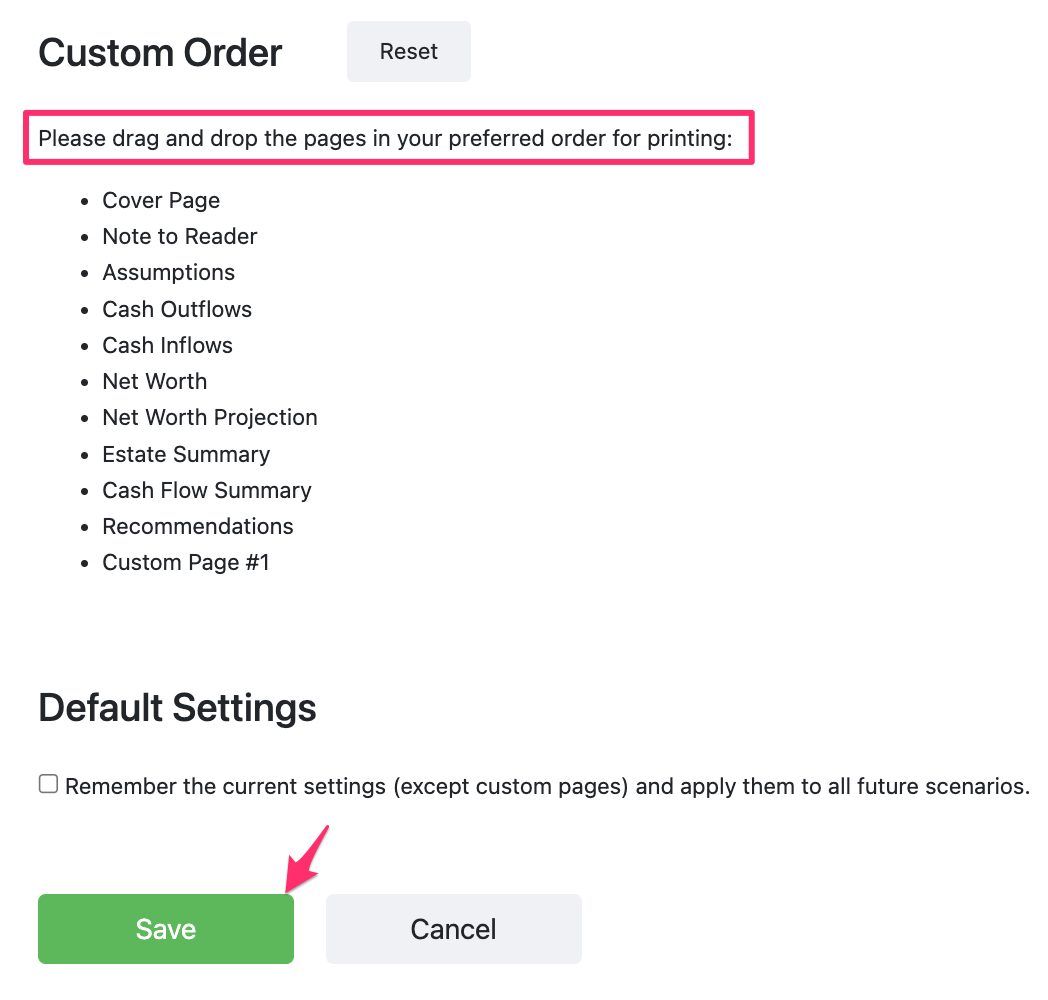
Once you have dragged the pages into your preferred order, make sure to click Save at the bottom of the page.
The Report Editor will continue to show the sections in the default order, but your Custom Order will be used in the Report Preview and the final Report PDF.
For more details please see this article: Report Settings.
- 2
-
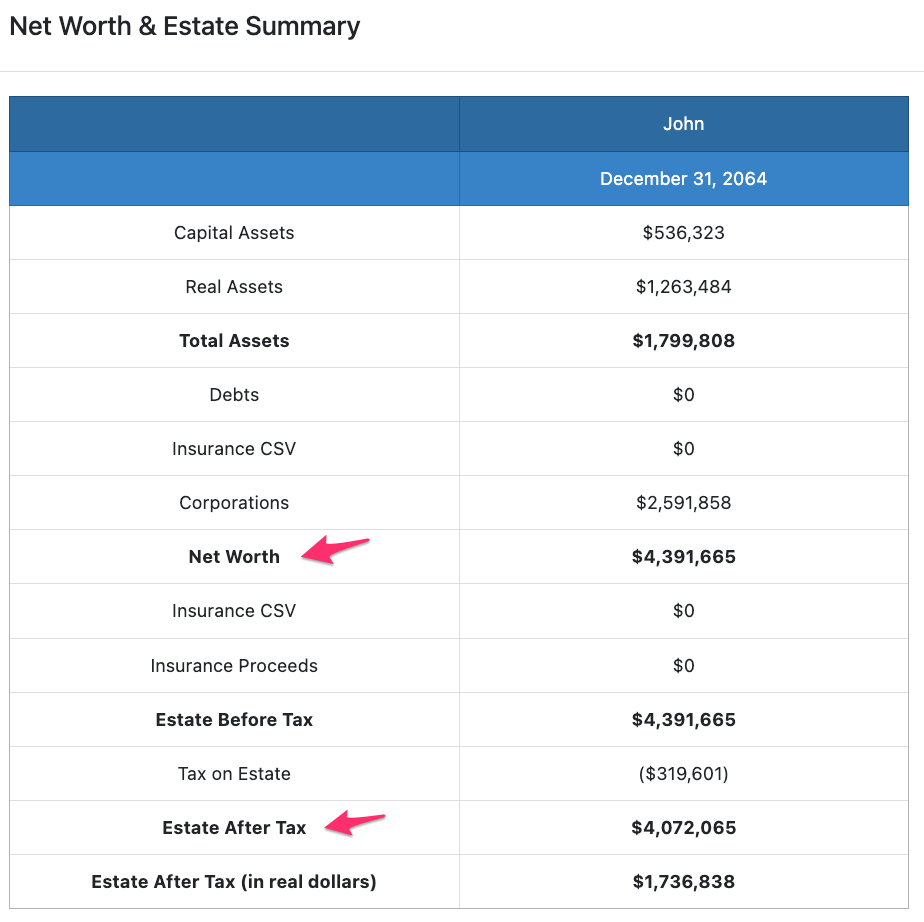
Simplified Net Worth and Estate Summary tables
We've simplified the Net Worth and Estate Summary tables to more clearly define what the client is assumed to have available at year-end if they survive (the Net Worth value) and how much is assumed to be available if they were to pass away in that year (the Estate Before Tax value).
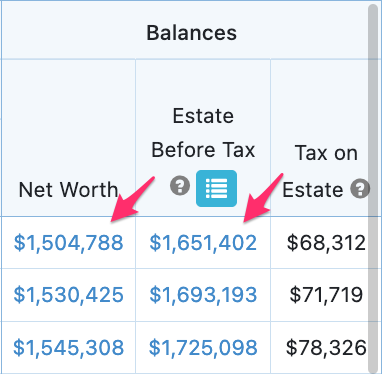
You can now click on either value in any year of the projection to see a breakdown of the calculation.
The Net Worth shows what the client(s) have available at year-end as they continue living.
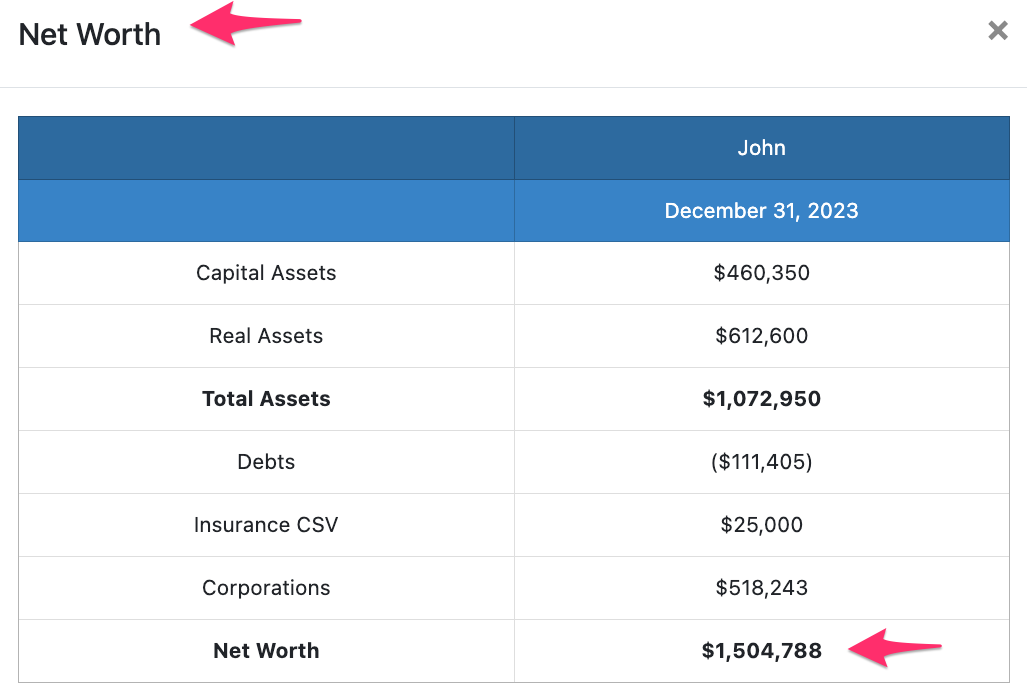
The Estate Summary shows what they would leave their estate if they were to pass away that year.
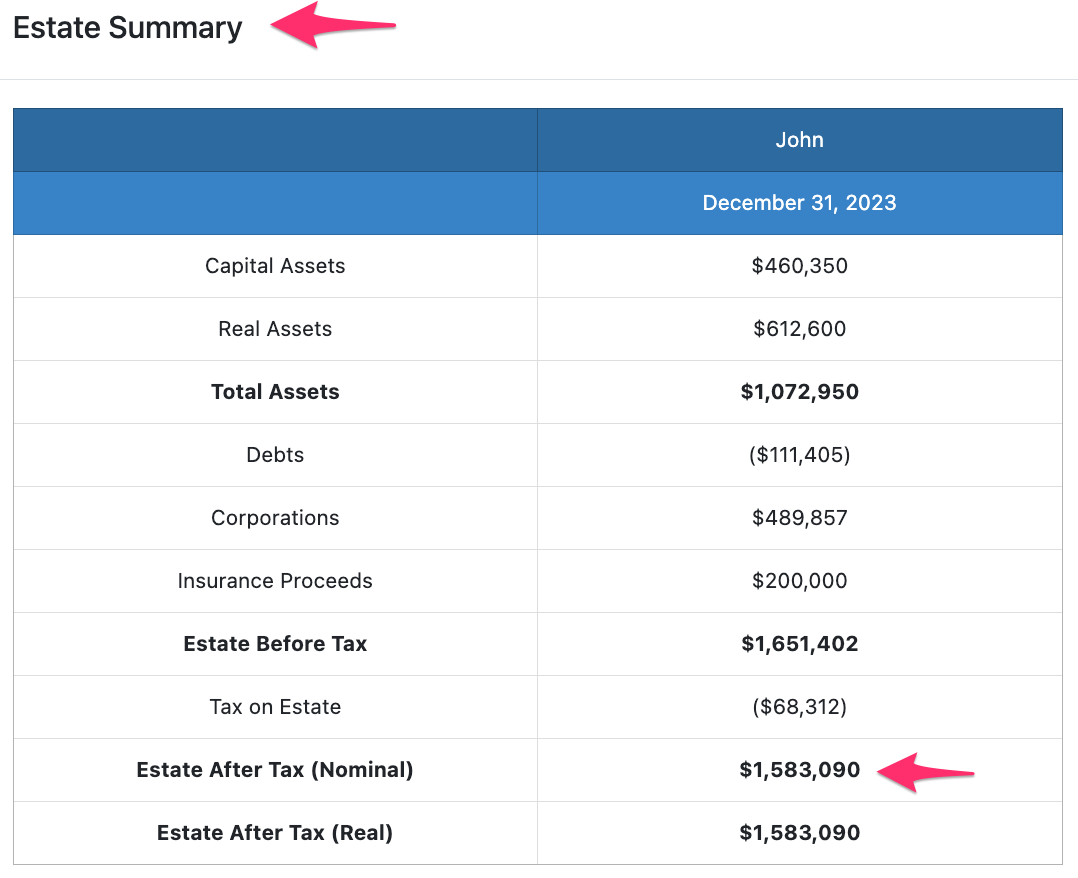
If you have multiple scenarios with the same Start Year and projection length, you can continue to compare these scenarios from the Estate Before Tax modal.
- 3
-
Easily edit Base Expenses
You can now edit the Base Expenses from the Scenario Setup -> Expenses page.
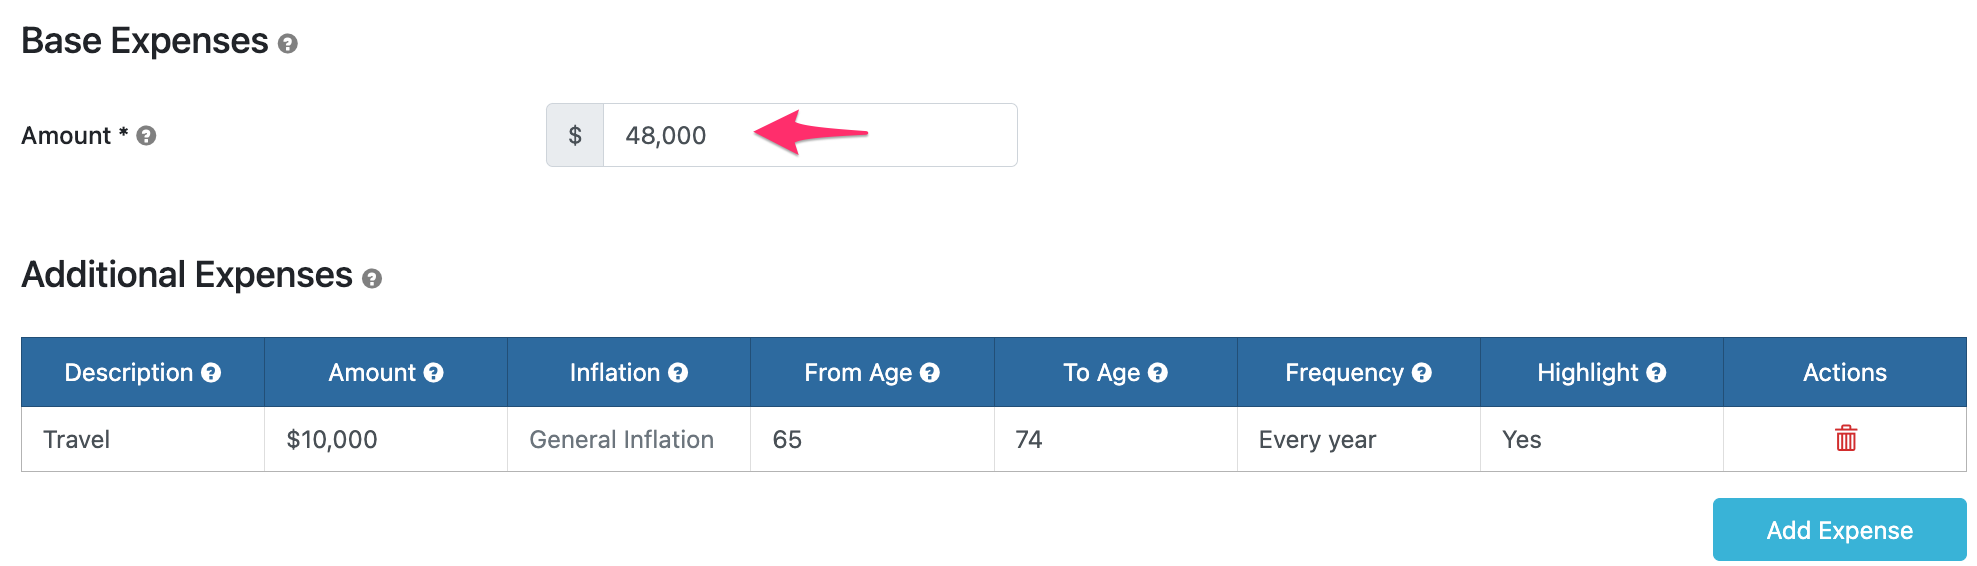
Thank you to everyone who has shared feedback about the new Expenses functionality. We're always updating new features based on your experience to make sure they're as valuable and intuitive as possible.
When you change the Base Expenses on this page, it will automatically update all years on the Planning pages for which the Cash Flow Management (CFM) is turned on.
If you've changed the Base Expenses on the Planning page to assume different values in different years, you'll only see the first year's value on the Scenario Setup -> Expenses page. In this case, you'll want to make changes directly on the Planning pages since an update on the Base Expenses will change all years at once.
- 4
-
Updated refer a friend process
We love it when you help spread the word about Snap, and we are continuing to thank you with referral credits. Now though, we are making it even easier for you to share what Snap is all about with your colleagues. Our new Referrals page provides a quick video and a special signup link.
If your referral signs up using the link on this page, they'll receive a 50% discount off their first month, after their 14-day Free Trial.
- If they sign up and stay with us beyond their 14-day Free Trial and 30-day money-back guarantee, you will receive a one-month credit to your account. That’s an entire free month of Snap Projections! If you are on annual billing, you will receive a $100 credit on your next renewal.
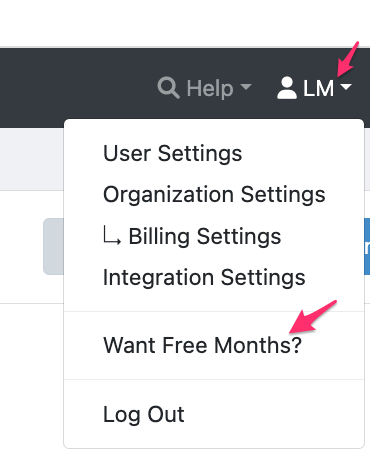
You can read more about our Referral process here. Also, from within Snap, you can click your initials at the top right, then Want free months? to find text that you can copy into an email to share with colleagues.
We appreciate your support!
October 30, 2023 - Improvements to Navigation, Corporate Dispositions, and Cash Flow Management
Highlights:
- 1
-
Improved navigation on the Planning pages
We've added a new way to navigate from left to right and top to bottom of the Planning pages to find the information you need quickly. You can now drag the Planning page tables in addition to scrolling.
Click on any portion of the Planning page table and drag your mouse to move the columns and rows as desired.

Previously, the three most common ways to navigate the Planning pages were to use:
- A scroll wheel on your mouse, with the option to hold SHIFT to scroll horizontally instead of vertically.
- The scroll bars on the right and bottom sections of the page.
- A multi-touch mouse that enables scrolling in all directions.
These options will all continue to be available, allowing you to navigate in your preferred way, with the option to combine multiple approaches to best meet your needs.
As a bonus, you can left-click once with your mouse on a table cell to highlight the value for presentation or copying. One value can be highlighted at a time.
- 2
-
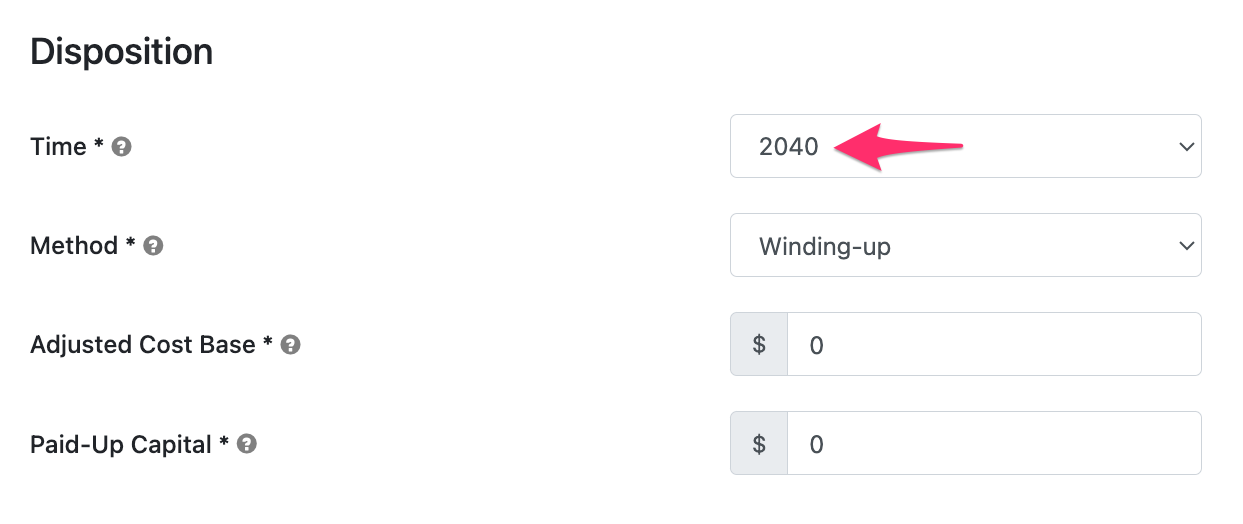
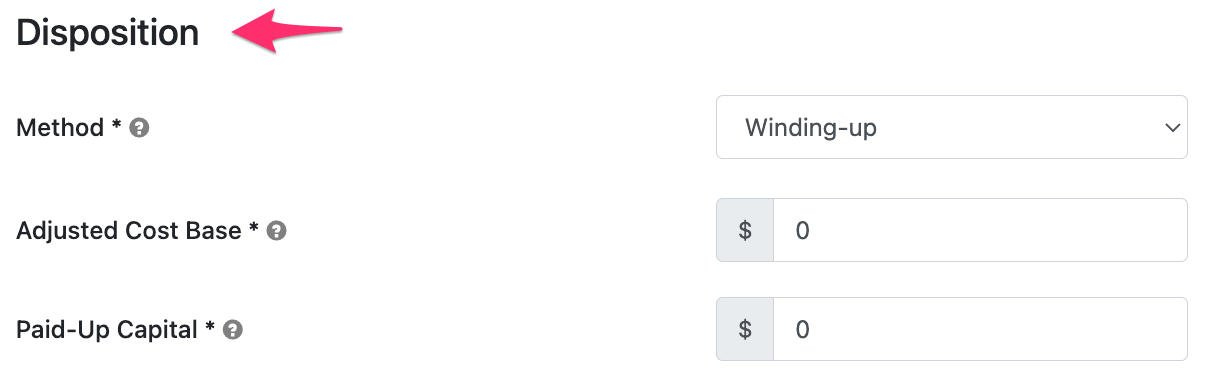
Corporate dispositions prior to death
You can now sell or wind up corporations in Snap prior to the final estate. Based on your selected Disposition Method (e.g., Winding-up or Share Sale), Snap can dispose of the corporation in the projection prior to death. You can change the Disposition Time on the Scenario Setup -> Corporation page from Post Mortem to any earlier year of the projection. In the below example, Snap will dispose of the corporation at the end of 2040.
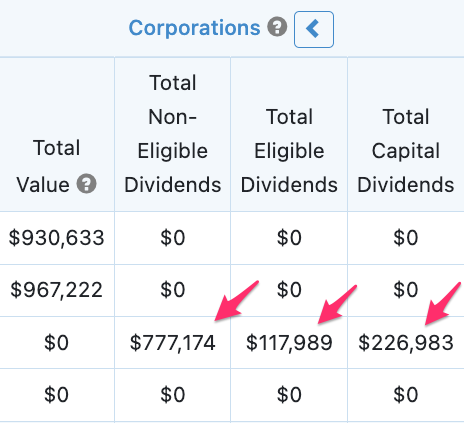
The Winding-up Disposition Method liquidates all holdings in the corporation and distributes the net proceeds tax-efficiently through the following order Return of Capital, Capital Dividend, Eligible Dividend (up to the ERDTOH), Non-Eligible Dividend (up to the NERDTOH), Eligible Dividend (up to GRIP), and then any remaining balance as an additional Non-Eligible Dividend.
The Share Sale Disposition Method sells the corporation for the Net Worth value at the time of the Disposition and realizes a personal capital gain for the difference between the client's ownership of the corporate Net Worth and the Adjusted Cost Base entered on the Scenario Setup -> Corporation page.
You can view the assumed distributions on the personal Planning pages in the Corporate Distributions section.
The Winding-up Disposition Method will show the Dividends paid to the shareholder in the year of the disposition.
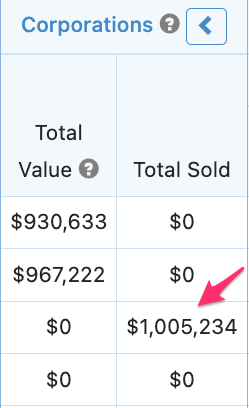
The Share Sale Disposition Method will show the total received for the sale of the corporate shares in the year of the disposition. A capital gain will be reflected in the Taxable Income based on the corporate Net Worth and Adjusted Cost Base.
For additional detail on setting the Disposition Time prior to the final year of the plan, you can review the key assumptions and calculations available in the article Corporate Disposition Prior to Death.
- 3
-
New surplus cash flow assumption options
We've added Advanced Options for both Corporate and Personal projections related to cash flow management.
These settings should be used very carefully because they will impact the cash flow in your projections.
Corporations
In some cases, you may wish to prevent the accumulation of cash surpluses or shortfalls until a certain year, possibly at the client's retirement age. Under Scenario Setup -> Settings -> Cash Balance click the Show button beside Advanced Options.

You have the option to delay the year to start accumulating surpluses and shortfalls in the projections. One typical use case is to delay the year to start accumulating cash flow shortfalls. This will allow you to contribute to the corporate Capital Assets, without also entering business income to support those contributions.

In this example, on the Corporate Planning page, you can see that the Cash Balance remains $0, even though there are years with a negative Net Cash Flow prior to 2030.

Personal Projections
In the personal projections, you can now elect to stop allocating cash flow surpluses and positive cash balances to Capital Assets. Furthermore, you can elect to stop saving surplus cash to the Cash Balance if desired.
This is an Advanced Option because you need to be very careful in changing the default cash flow management settings. It is possible now to disregard surplus cash that could have been used by your clients in their projections. The outcome may be greatly impacted if you use this feature incorrectly.
To access the Advanced Options, click the blue icon in the CFM header on the Planning page.

If you deselect the option to Allocate cash flow surpluses and positive cash balances to capital assets, the surplus cash will be displayed under the Net Cash Flow column rather than being automatically contributed to the Capital Assets.

This allows you to see how much surplus cash is available to the individual each year and this surplus is assumed to be spent. (Note that the surplus is not saved to the Cash Balance by default.)
If you do wish to save this surplus into a Cash Balance, rather than into the Capital Assets, you can select Scenario Setup -> Settings -> Cash Balance and enable the Advanced Option to Accumulate cash flow surpluses.

With this setting checked, the surplus cash is saved to the Cash Balance and spent later in the projections if needed.

In this example, in 2029, the withdrawals from the Cash Balance are displayed as a negative Net Cash Flow value. Cash from the Cash Balance is spent first in the projections, prior to withdrawals being made from the Capital Assets.
August 22, 2023 - The Planning pages have even more data!
We recognize that changes take time to get used to and we've introduced quite a few in recent months. That's why this update is the last major change we'll be making for some time related to the way that you interact with the personal Scenario Setup and Planning pages.
With this update, we've brought more information to the forefront on the Planning pages and we believe it's going to be even easier to discuss the projections with your clients as a result. You can now see more information that wasn't previously visible, collapse and expand sections, and click column headers to go directly to that page in Scenario Setup. With more detail on the Combined Planning page, you'll spend less time switching to the Individual Planning pages.
Here's a short video overview with the highlights which are also described below.
Highlights:
- 1
-
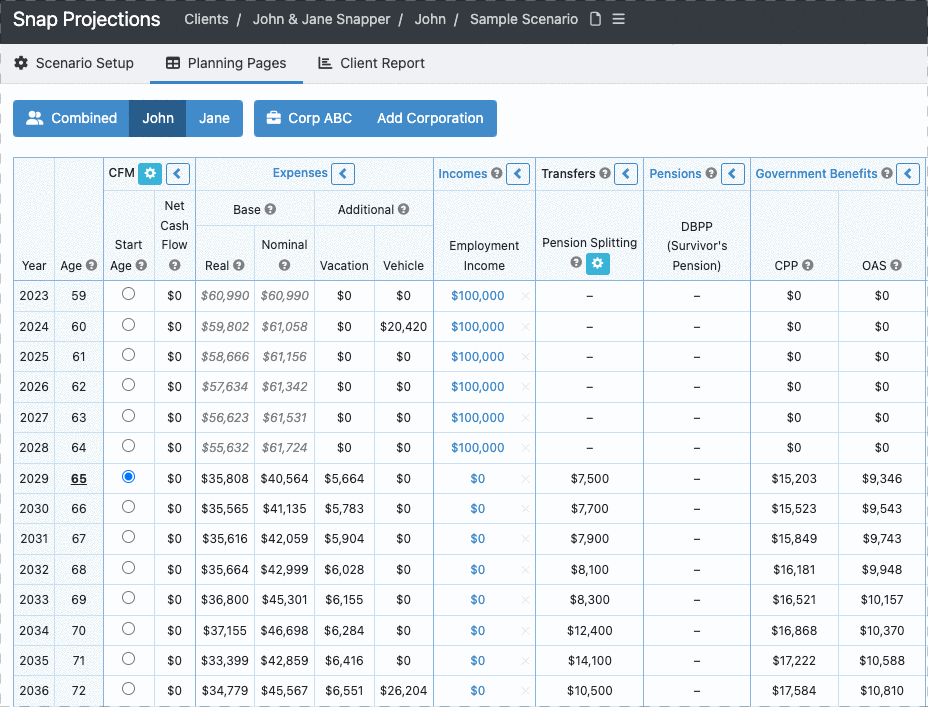
New columns on the Planning pages
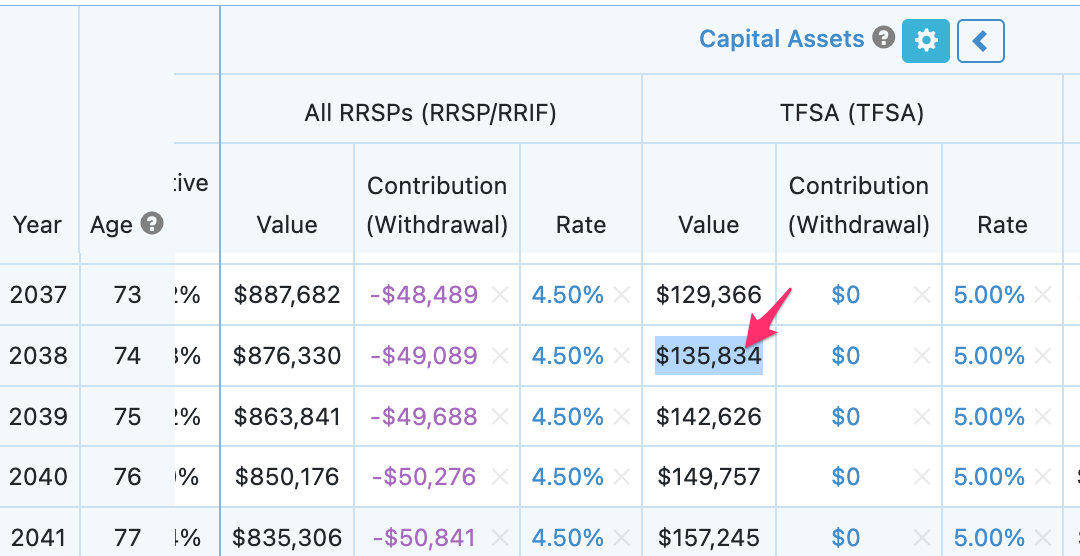
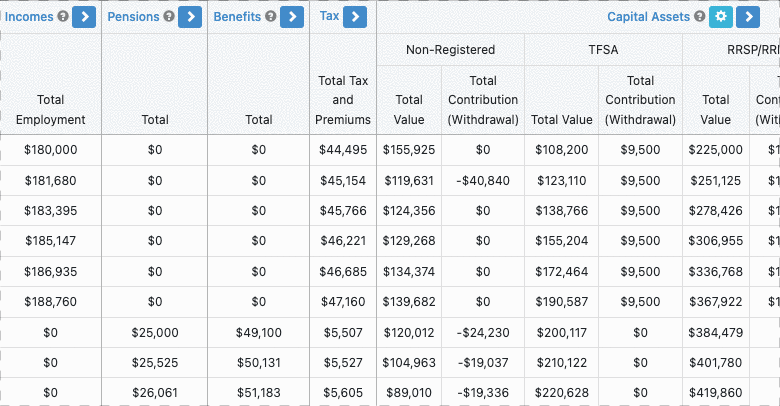
The Planning pages now have additional information categorized in various sections including Cash Flow Management (CFM), Expenses, Incomes, Pensions, Benefits, Tax, Capital Assets, Debts, Insurance, Real Assets, Corporations and Balances (Net Worth, Estate). Each section can be viewed in a collapsed mode to show totals or an expanded mode to show details.
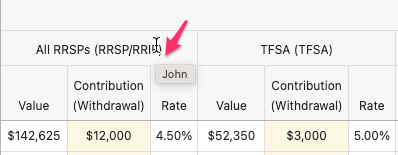
With additional information displayed on the Combined Planning page, you won't need to switch to the Individual Planning pages for these details such as contributions to Capital Assets for each spouse. To see which spouse an item refers to, hover your mouse over the column header (don't click the header, just hover your mouse over the title). A pop-up window will appear with the name of the person it relates to.
For example, here on the Combined Planning page in the Capital Assets section, hovering the mouse over the All RRSPs header displays that John is the owner of this account. Note that the Combined Planning page now displays Contribution (Withdrawal) values which were previously only available on the Individual Planning pages.
Note that overrides such as those in yellow in the image above are visible in the expanded view, but they can't be edited directly on the Combined Planning page. Edits such as these must be done on the Individual Planning pages.
Tip: Scrolling left and right
With the additional sections, the Planning pages can be expanded so that they are wider than before. Remember that you can scroll left and right more easily using a trackpad or mouse with a left/right scrolling feature. Also, if your mouse has a vertical scroll wheel, hold the Shift key on your keyboard and scroll up for left, and down for right.
- 2
-
Expand and Collapse sections
You can collapse and expand each section using the left and right arrow icons in the column header. Click the right arrow icon to expand and see more details, or click the left arrow icon to collapse and see summarized information.
There are new columns under the collapsed sections to provide details that weren't available in the past. These include:
Real Estate: Purchased (Sold)
- A positive value represents the amount paid for a new real asset
- A negative value represents the sale proceeds of the real asset (value of the asset at the time of the sale)
Debts: Paid (Taken)
- A positive value represents the amount of money paid against a debt
- A negative value represents the amount of money borrowed

- 3
-
Default Settings
We've set up the default settings to most closely mimic the views that were previously available. The most detail is displayed by default on the Individual Planning pages and the summarized information is displayed by default on the Combined Planning page. Once you expand or collapse a section for a particular client scenario, this selection will be remembered and will override the default settings until your login session ends. Other scenarios for the same client and other client projections will use the default settings until you adjust them.
Default States
- Individual Planning pages
- all sections are expanded except for the Expenses section (which is typically not an editable section on this page)
- Combined Planning page
- all sections are collapsed except for CFM (Cash Flow Management) and Expenses (which are typically edited on this page)
- 4
-
Hyperlinked Column Headers
To make it even easier for you to navigate from the Planning pages, the column headers are clickable and will take you directly to that related page under Scenario Setup.
July 13, 2023 - Expenses and New Charts!
This update significantly improves the way you can conduct goals-based planning within Snap Projections. With this update, you'll have additional options to build in other expenses and financial goals with a high level of flexibility to truly show your clients how their spending goals will be met. Additionally, we've made some updates to the charts that will help to enrich your conversations and client presentations.
Here's a 3-minute video overview created by our Product Manager, Jim Kort.
Highlights:
- 1
-
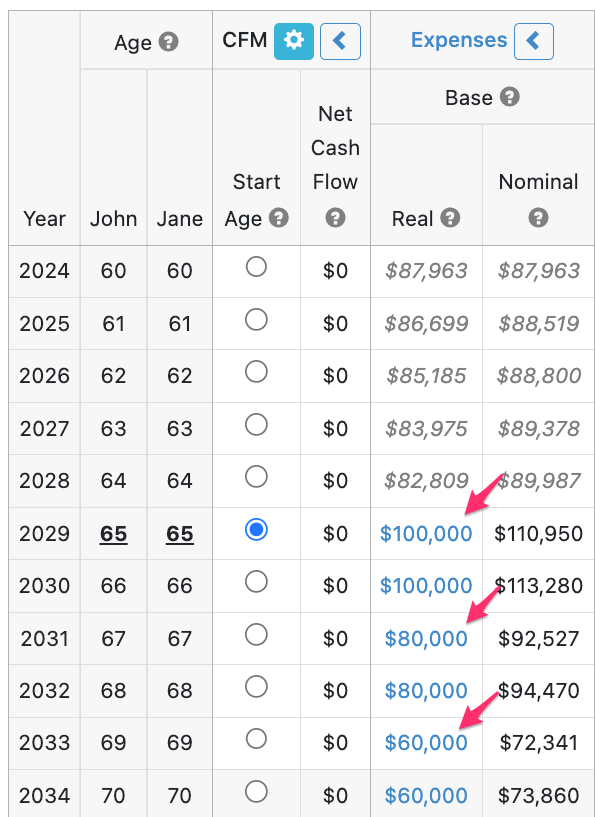
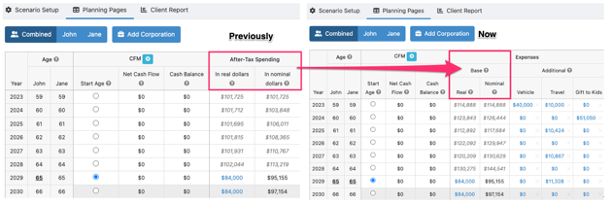
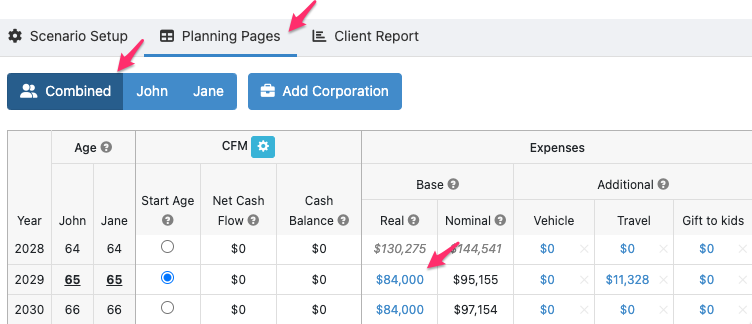
After-Tax Spending is now termed Base Expenses
On the Planning page, you'll see the After-Tax Spending (real and nominal dollars) has been replaced with Base Expenses (real and nominal dollars).
- 2
-
The new Expenses page: Base Expenses
Prefer to watch a 4-minute training video on Base Expenses, here you go 🙂
You'll access the new Expenses page under the Scenario Setup menu just after the General page.

One of the exciting changes that we're making is providing you with the opportunity to enter Base Expenses (previously known as After-Tax Spending) directly in the initial Scenario Setup flow before you go to the Planning page. Don't worry if you aren't sure what to enter here, just leave the amount $0 and you can still edit the value directly on the Planning page when you get there, or run a Sustainable Scenario to have it generated for you.
You can think of Base Expenses as the minimum amount of after-tax spending that your clients need, excluding items that are entered on other pages such as debt payments, insurance premiums, savings contributions, etc. The amount entered for Base Expenses will be populated every year starting at the client's Retirement Age or the first year of the plan, whichever is later.

Use the question mark icons in the application to see further tips.
After you have viewed the Planning page for a client, you will no longer be able to edit the Base Expenses on the Expenses page, you must edit it directly on the Planning page.

- 3
-
The new Expenses page: Additional Expenses
You're now able to enter Additional Expenses that you wish to separate out from Base Spending such as recurring or one-time expenses. These could include travel, vehicles, renovations, gifts to kids, etc.
Prefer to watch a short video demonstration?
Enter Additional Expenses under Scenario Setup -> Expenses.
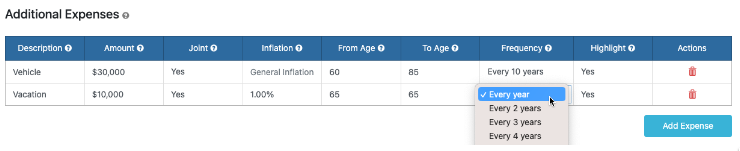
You can specify whether the expense is a joint expense, the inflation rate for the expense, and the years the expense is applicable using the From Age, To Age, and Frequency.
You can choose to Highlight up to 6 expenses. Highlighting means that these expenses will be displayed individually on the Cash Outflows chart. If the expense is not highlighted, it will be referred to as part of the Additional Expenses category on the Cash Outflows chart.
Additional Expenses can be edited within the table, or on the Combined Planning page.
Note: Any existing scenarios where you have used a negative income to represent an expense will remain unchanged. You can manually update these projections to use the new Additional Expense section instead of a negative income, but it isn't required. Negative incomes will show up as Other Outflows on the Cash Outflows chart.
To enter tax-deductible expenses, you can still enter these as a negative taxable income if desired. Or, enter them as an Additional Expense and also enter the corresponding Tax Deduction on the Income Taxes page for the applicable years.
- 4
-
Charts: Cash Outflows, replacing After-Tax Spending
Charts are accessed from the Planning pages or from the Client Report. You'll notice that the charts will now nearly fill your entire screen when opened from the Planning pages.
The new Cash Outflows chart is displayed first. This chart provides much more detail than the chart it is replacing, the After-Tax Spending chart which only showed the client's After-Tax Spending and Net Cash Flow. Now you can see the Base Expenses (previously termed After-Tax Spending), Additional Expenses you have entered, contributions to Capital Assets, Debt payments, Insurance premiums, Income Tax, etc.
Hover your mouse over the item in the legend to highlight it in the chart or click the item to remove or add it back in.

The Cash Outflows chart has a Total Inflow dotted line to help you spot shortfalls. Where the Total Inflow dotted line falls below the top of the Cash Outflow bars, there is a shortfall.

- 5
-
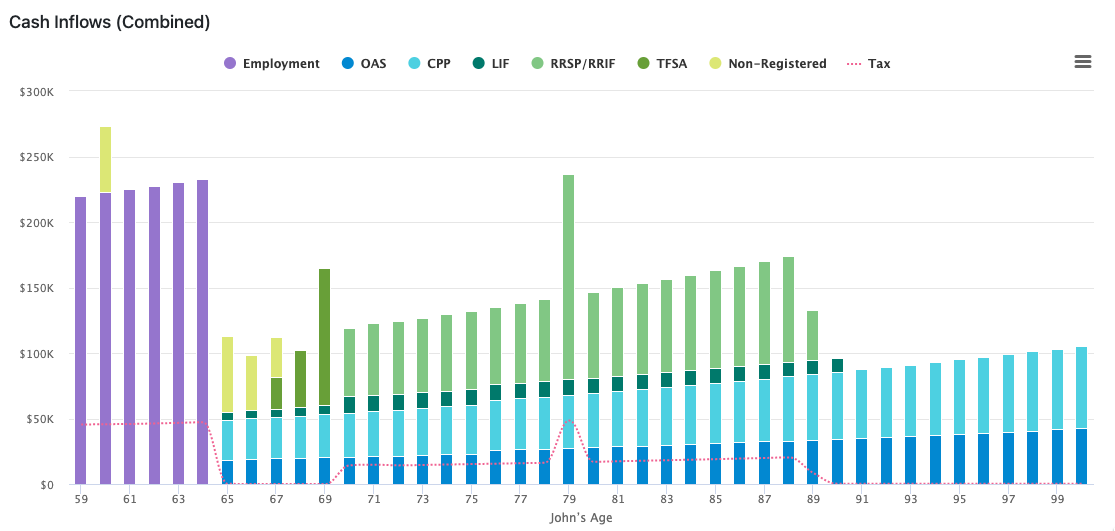
Charts: Cash Inflows, replacing Sources of Income.
For more clarity, we've renamed the previous Sources of Income chart as Cash Inflows to align it more accurately with its content.
The combination of the Cash Inflows and Cash Outflows charts empowers you to engage in more meaningful conversations with your clients about how their cash inflow sources will fund their expense priorities over time.
June 12, 2023, Restructured Planning pages
The Planning page has been restructured to make the column placement more logical and the entire page easier to navigate, reconcile, and work with.
You'll notice right away, a new section dedicated to Cash Flow Management (CFM). The Net Cash Flow and Cash Balance columns have been moved into this section, and out of the Income section.
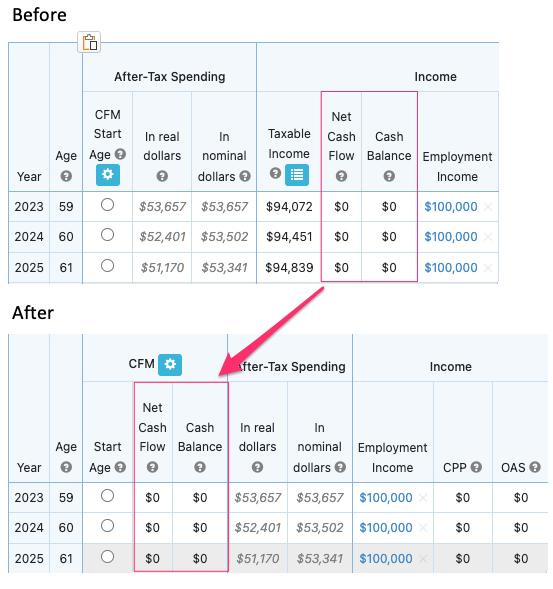
The values under Net Cash Flow and Cash Balance will be $0 for most projections. If they are not zero, you can read more about this here: How to clear non-zero Net Cash Flow and/or Cash Balance values.
We've also moved the Taxable Income to a new section called Income Tax. This section expands the previous version's section called Tax and Deductions, to now group all Taxable Income, annual CPP/QPP/EI Deductions, Total Tax, and Tax Rates together. This section is located to the right of the Income section.
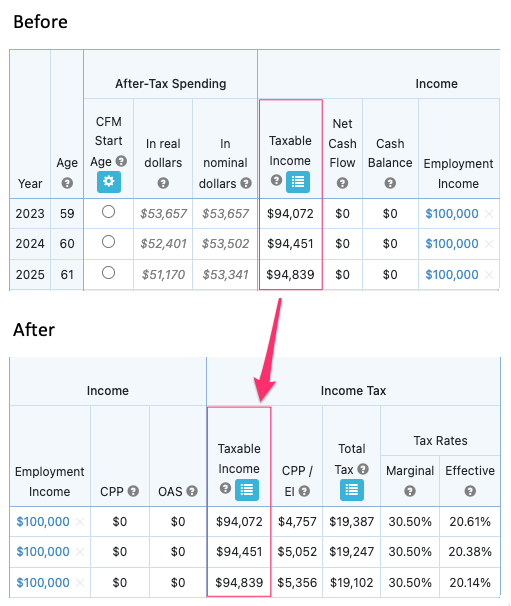
The Marginal and Effective annual tax rates previously were grouped in the Tax and Estate section on the right-hand side of the Planning page, and now they are grouped with the other annual tax information under Income Tax. The Tax and Estate section has been renamed to Balances and contains the Estate Before Tax and the Tax on Estate columns.

Note that the Excel Export of the Planning page will also reflect these changes.
June 1, 2023, Release Notes
Highlights:
- 1
-
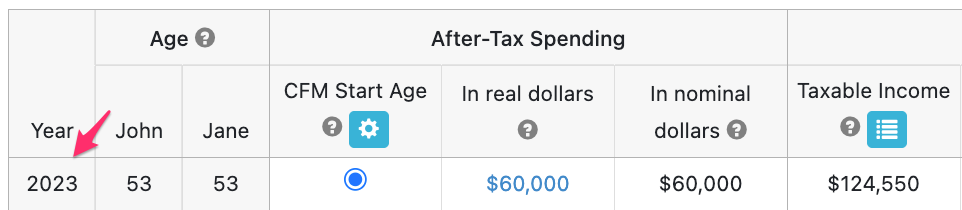
Easily disable the Cash Flow Management (CFM) when desired
The Cash Flow Management (CFM) is a tool in Snap that allows you to automate deposits and withdrawals in the plan to achieve a target After-Tax Spending goal. Occasionally, you may wish to turn off the CFM tool for the entirety of a projection.
This can now be done by clicking on the gear symbol in the CFM Start Age column and then unchecking the box for Enable cash flow management for this scenario before clicking Save.
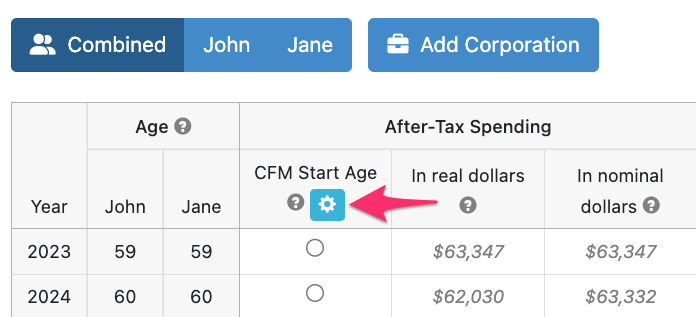
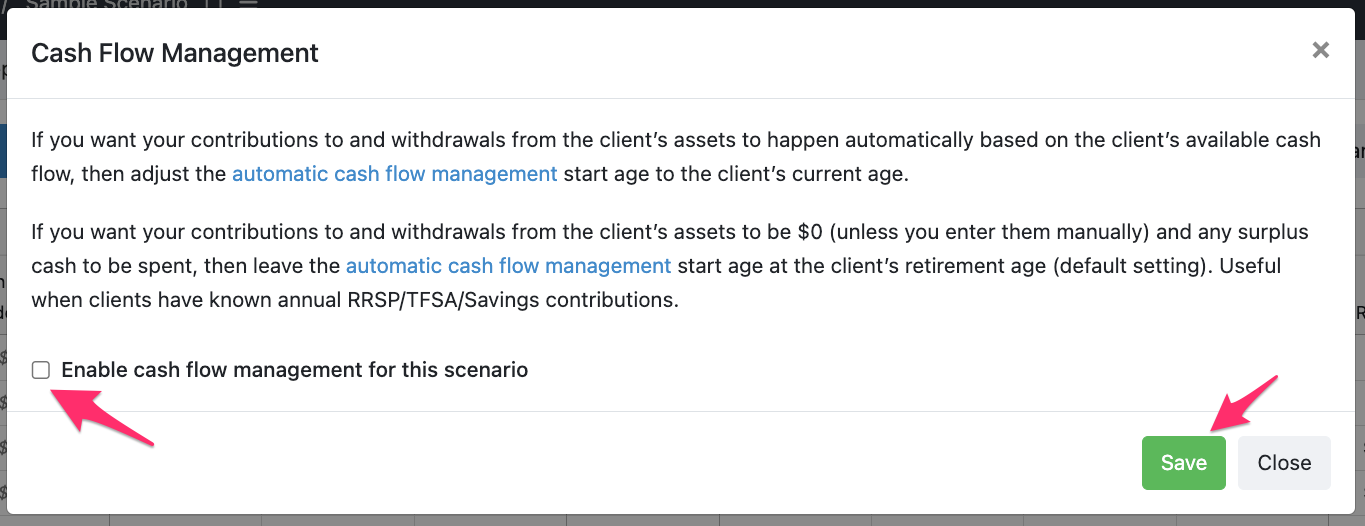
Why would you want to do this? Perhaps you would like to show your client their projected After-Tax Spending for each year based simply on pension income, government benefits, and RRIF/LIF minimum withdrawals. In this case, you aren't required to enter a spending target, instead, you can see what your client can spend based on this income and no other automatic withdrawals from their accounts. This setting will also prevent any additional automatic savings during retirement.
- 2
-
Update to 2023 FP Canada Assumption Guidelines
The latest (2023) projection assumption guidelines from FP Canada and the Institut québécois de planification financière can now be imported into your projections.
You can do this from the Scenario Setup -> General page by clicking Use Guidelines.

This will update your Inflation Rates and Capital Asset Rates of Return assumptions to the following values.

Fees: Note that the investment management fees paid by clients both for products and advice must be subtracted from these values to obtain the net return. Actual net portfolio returns will depend on the actual product and portfolio management-related fees.
Note that the Show Projections to age value will also update to age 100 after clicking Use Guidelines.

To set these rates as your default for all new projections, please select Defaults and then Save current page settings for new scenarios.

Additional detail about these assumptions is available here: Projection Assumption Guidelines
May 18, 2023, Simplified Income input and text selection and editing
Highlights:
- 1
-
Improvements to Income input and customization
We've added three new input fields to the Scenario Setup -> Income entry. You can now specify if you'd like an income to apply Indexing directly from the input page. You can also enter a From Age if an income starts on a future date or at a specific age and enter a To Age if an income stops on a future date or at a specific age.

If you delete the Indexing field value and leave it empty, your Income will be linked to the Inflation Rate on the Scenario Setup -> General page. You'll see "General Inflation" in grey text under Indexing in that case. If this rate changes (either through a manual update or when using the Stress Testing add-on) Snap will automatically adjust your Income values on the Planning Page.

You can also prorate Income by using the gear icon in the From Age and To Age fields to select a specific date. This can be helpful if a client plans to retire midway through the year.

In addition to these new input options, you'll still have the same great flexibility to customize values on the Planning Page as desired by applying overrides.
- 2
-
Addition of Pension and Income Planning Page overrides
Income Planning Page overrides
Previously, when you changed a value on the Planning Page for either an Income or a Defined Benefit Pension Plan (DBPP), the change didn't reflect an override. Going forward, changes on the Planning Page will behave consistently across Incomes, Pensions, Assets, and Debts.
When you change an annual value or period of time for an Income or DBPP, you'll see yellow shading and an "x" icon on the right of the cell.
You can clear these overrides by clicking on the "x" individually or by selecting the dollar amount and then checking the boxes for Copy down to age and Clear override.

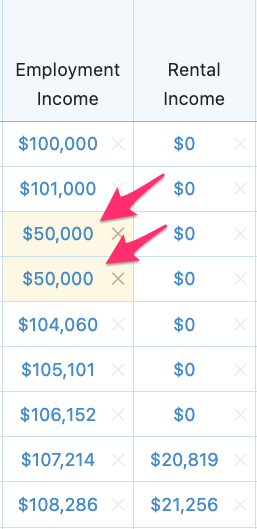
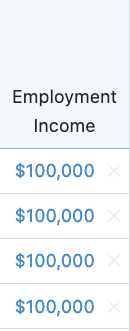
If you change the Income input on the Scenario Setup -> Income page, your overrides will remain unchanged. For instance, if you enter an Employment Income of $100,000 indexed at 1% and then override two years to $50,000 on the Planning Page, you'll see the following values on the Planning Page.

If you then update the Employment Income on the Scenario Setup -> Income page to $90,000, all values on the Planning Page will be updated except for those with overrides.

You can change the $50,000 override to a different value, or clear the override from the Planning Page if desired.
- 3
-
Adjustments for existing plans
Your existing scenarios will be automatically converted to the new format without any steps required on your end. Snap will try to automatically populate the Indexing, From Age, and To Age inputs for all Incomes in your existing scenarios.
If Snap is able to identify a direct mapping from an existing Income in the plan, then it will fill these fields in for you automatically and leave the Planning Page column without any overrides.
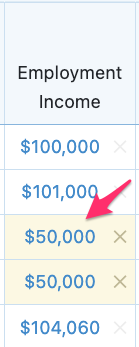
In this example, the Employment Income was left unedited in an existing projection. It displays $100,000 of Employment Income each year of the plan from the first year until retirement.
Here, Snap would automatically map this to the new format with Indexing as 0%, the From Age empty (because it begins at the start of the plan) and the To Age set to the year before retirement.

If Snap is unable to identify a direct mapping for an existing Income in the plan, then it will ensure all of the values on the Planning Page remain the same by applying overrides as needed.
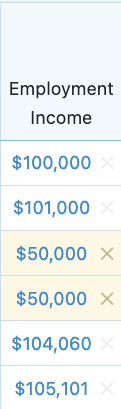
In this example, the Employment Income was changed midway through the plan to a different value (e.g., $50,000) for two years. In this case, Snap will set those two years to $50,000 with overrides.

This will ensure that the values from your original projection remain the same. When you access your plan, you may clear the overrides on the Planning Page if desired and adjust the input values on the Scenario Setup -> Income page.
For DBPPs, a similar approach will be taken to determine whether any changes were made on the Planning Page in the existing plan. If no changes were made, then Snap will leave the DBPP as is on the Scenario Setup -> Income page and will not apply any overrides on the Planning Page. If changes were made on the Planning Page, then Snap will leave the DBPP as is on the Scenario Setup -> Income page and override the DBPP column as required on the Planning Page to keep all values as they were.
- 4
-
Simplified text selection and editing
When you click a value on the Planning Page, open a Scenario Setup page, or otherwise move throughout Snap, the software will automatically highlight the first field available for editing.


Previously in Snap, you would need to click on the field before being able to change the value. These updates are designed to save you time and create a more consistent and intuitive planning experience.
In addition to the selection updates, you can now more easily click throughout a section of text to place your cursor and make changes without highlighting the existing information in the field.
Feb 16, 2023, Corporate Life Insurance and Expanded Estate Summary
Highlights:
- 1
-
New corporate-owned life insurance feature
We've released a dedicated corporate-owned life insurance feature to help you illustrate to clients how corporate-owned life insurance may be useful to help them best meet their goals.
Prefer to watch a short video on this feature? Here's a 13-minute video summary.
You can also review our 1-hour webinar that covered the corporate-owned life insurance feature and the updates to corporate disposition and estate calculations.
The corporate-owned life insurance feature in Snap has been designed primarily to address the following two use cases:
- Demonstrate the potential benefit of using excess cash in a corporation to purchase permanent life insurance with the Client or Spouse as the insured individual for the policy. This strategy can help reduce passive investment income in the corporation, potentially avoiding reductions to the Small Business Deduction (SBD). It may also allow future balances to be distributed from the corporation on a more tax-efficient basis (e.g., through the Capital Dividend Account). To ensure that your plans are only comparing differences in investment strategies, both scenarios should select the Winding-up Disposition Method.
- Demonstrate how corporate-owned life insurance could help provide retirement income. This may be done through borrowing against the Cash Surrender Value (CSV) during the insured individual's life, or through the use of the Death Benefit to provide income to the surviving partner.
You will have the option to copy the Death Benefit, CSV, Adjusted Cost Base, and Annual Premium from your insurance quote provider and paste the values into Snap Projections.

- 2
-
Update to the Corporate Disposition on Death Calculation
We have updated the Corporate Disposition on Death Calculation to allow you to select between two common methods used upon death. You can continue to use the existing calculation that assumes a Share Sale. Or, you can use the new default approach that assumes a method of Winding-up the corporation through distributions.
The corporate disposition at death provides two values used in the personal Net Worth & Estate Summary table. These are the Corporations value and part of the Tax on Estate value.

You can control the Corporate Disposition on Death Calculation used and the input assumptions from the Disposition section at the bottom of the Scenario Setup -> Corporation page.
- 3
-
Cash surrender value is now added to the client's net worth
We have added the CSV of life insurance policies to the client's Net Worth. This will be reflected on the Planning Pages, in the Charts, and in the Client Report.

- 4
-
Expanded Estate Summary table
The Estate Summary table has been updated and retitled to the Net Worth & Estate Summary table. We've added several values and focused the table on two sections. The top section breaks out the Net Worth at year-end (which is what the client can expect to own as of that year). The bottom section breaks out the Estate After Tax that shows how much would be available to the estate if they pass away in that year.
Feb 1, 2023, Release Notes
Updates to charts on the Planning Pages, Client Report, and Stress Testing
As we prepare for our next major feature release, we've made several enhancements to the charts throughout Snap.
- The colour palette has been updated to avoid using the same colour for multiple purposes throughout different charts in Snap.

- The Sources of Income chart is now structured with the most consistent incomes included first each year, and more variable incomes layered on top.

- When you access Charts from the Planning Pages, the name of the individual client is listed to the right of the title for the chart. If you're viewing the total household chart, you'll see Combined.


Jan 25, 2023, Release Notes
Update to real dollar calculations in Snap
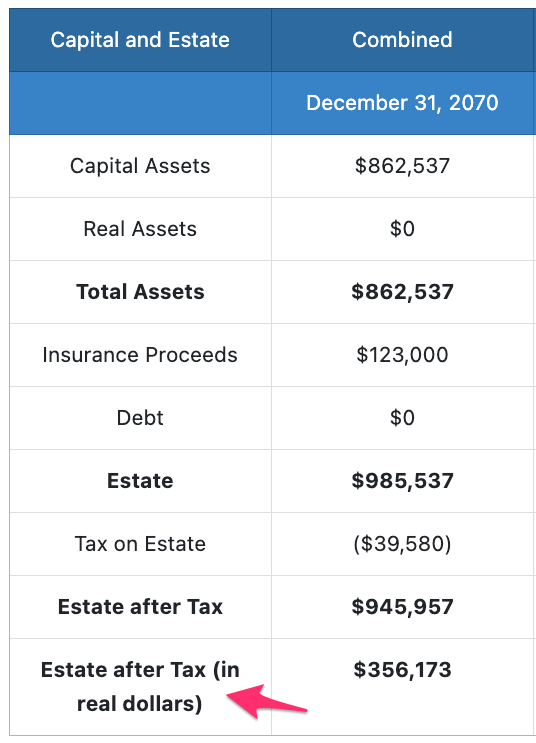
We've changed the year that is used for real dollar calculations in Snap from the current calendar year to the Start Year of the projection. For instance, if your plan has a Start Year of 2023, then all real dollar values (e.g., After-Tax Spending, Estate after Tax) referenced in the plan will be based on 2023 (regardless of when the plan is being viewed).
On the Planning Page, the only value displayed in real dollars is the After-Tax Spending (In real dollars) value:

In the Estate Summary, the only value displayed in real dollars is the Estate after Tax (in real dollars) value:
Previously, we used the current calendar year as the reference point for real dollar calculations, so that the real dollar value would always be relevant to the individual viewing the plan. For instance, if you had a plan with a Start Year of 2023 and you were viewing the plan in 2022, then all real dollar values referenced in the plan were based on 2022. Now, all real dollar values referenced in this plan will be based on the Start Year of the plan (in this case 2023). This change will simplify calculations in Snap and keep figures consistent over time, as the Start Year of an old plan never changes.
This will have no impact on your active plans if they have a Start Year of 2023. Even though we're changing from referencing the calendar year to the Start Year, because these are both currently 2023, there is no change to the calculated values.
The Start Year is the first year shown on your Planning pages and can also be found and changed from the Scenario Setup > General page.

If you're viewing an older plan, the real dollar values (e.g., After-Tax Spending, Estate after Tax) have decreased to reflect the real dollar amount as of the Start Year of the plan (e.g., 2018) instead of the current real dollar amount in 2023. All nominal dollar spending values (which drive the calculations in Snap) have remained unchanged through this process, only the reference real dollar values have changed.
Jan 6, 2023, Financial data update for 2023
Financial Data Update for 2023
We have completed the 2023 update with all available and relevant financial figures and tax data so you can create up-to-date, accurate projections for your clients in 2023. Some of the highlights are the following:
- The RRSP maximum contribution limit is $30,780.
- The TFSA maximum contribution limit is $6,500, however, the maximum cumulative limit for a client who has never contributed to a TFSA is as high as $88,000.
- The CPP/QPP Maximum Pensionable Earnings is $66,600.
- The CPP/QPP Maximum Annual Benefit is $15,678.84.
- The OAS Maximum Annual Benefit is $8,250.72.
- The OAS Clawback Threshold is $86,912.
- The EI Maximum Insurable Earnings is $61,500.
- EI premium rates and maximums (the maximum annual employee premium is $1,002.45).
- Federal and Provincial Tax data for all provinces including Quebec. This includes tax credits, tax brackets and tax rates, and other relevant figures.
- The OAS benefit has been increased by 10% for individuals aged 75 and older.
- The continued phase-in of the Enhanced CPP deductions and benefits.
While all your new scenarios will be created using the new values going forward, your old scenarios created with the starting year of 2022 and earlier have not been recalculated. Rebasing allows you to take any older scenario and create an updated copy for 2023. When you rebase a scenario, the original is kept intact so it can be available indefinitely (unless you delete it) for historical, compliance, or other purposes. Here is more information about scenario re-basing for 2022.
Scenarios that you created in 2022 with the starting year of 2023 will not require you to rebase them. These scenarios will have the new financial data for 2022 applied to them when you click the Run Scenario button. More detail can be found here: What happens to the projections when you open them in a new year?