Creating Your First Projection
We want to make sure everything is in place for you to feel welcome and at home so we created this step-by-step article on creating your first projection with Snap Projections. We also have a series of short videos demonstrating the steps if you prefer.
While Snap was designed to be really intuitive, the instructions below will additionally help you stay on track. Let's get started!
In this article:
- Get Started
- Enter Client Data
- Enter General Information
- Enter Expenses
- Enter Income
- Enter Assets
- Enter Debts
- Enter Government Benefits
- Enter additional Scenario Setup information as desired
- The Planning Page - Enter Savings Contributions
- The Planning page - Adjust Base Expenses
- The Planning page - Run the Scenario or try the Recommendations
- Review the Scenario
- 1
-
Get Started
To create a new client scenario, click the New Client button on the Clients page.
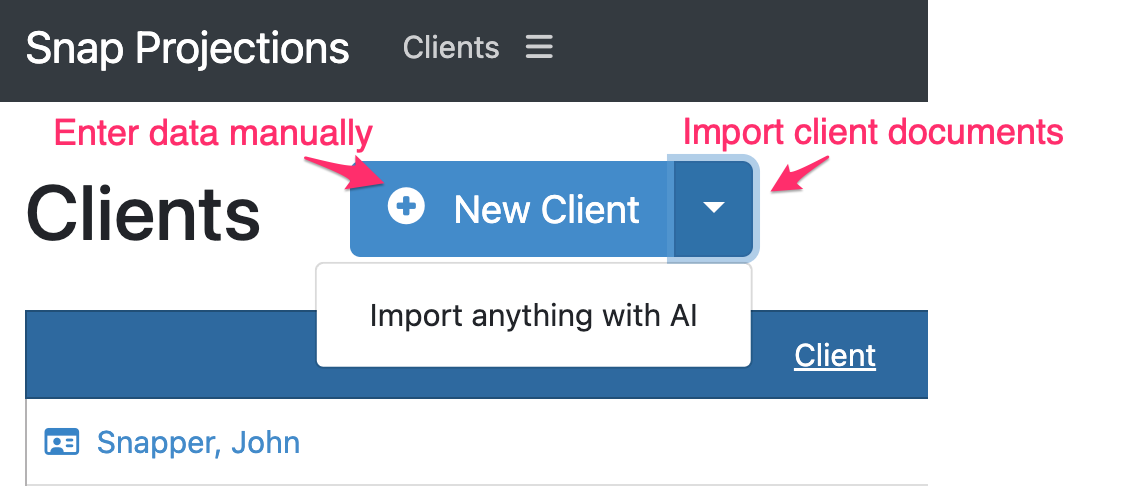
This article reviews the manual data entry of client information. You could also upload client documents and notes and have the AI Import Assistant extract relevant information and use it to complete the Scenario Setup pages for you.
- 2
-
Enter Client Data
On the Client page, fill out the basic personal information of your client. Click Add Spouse to add any relevant spousal information.
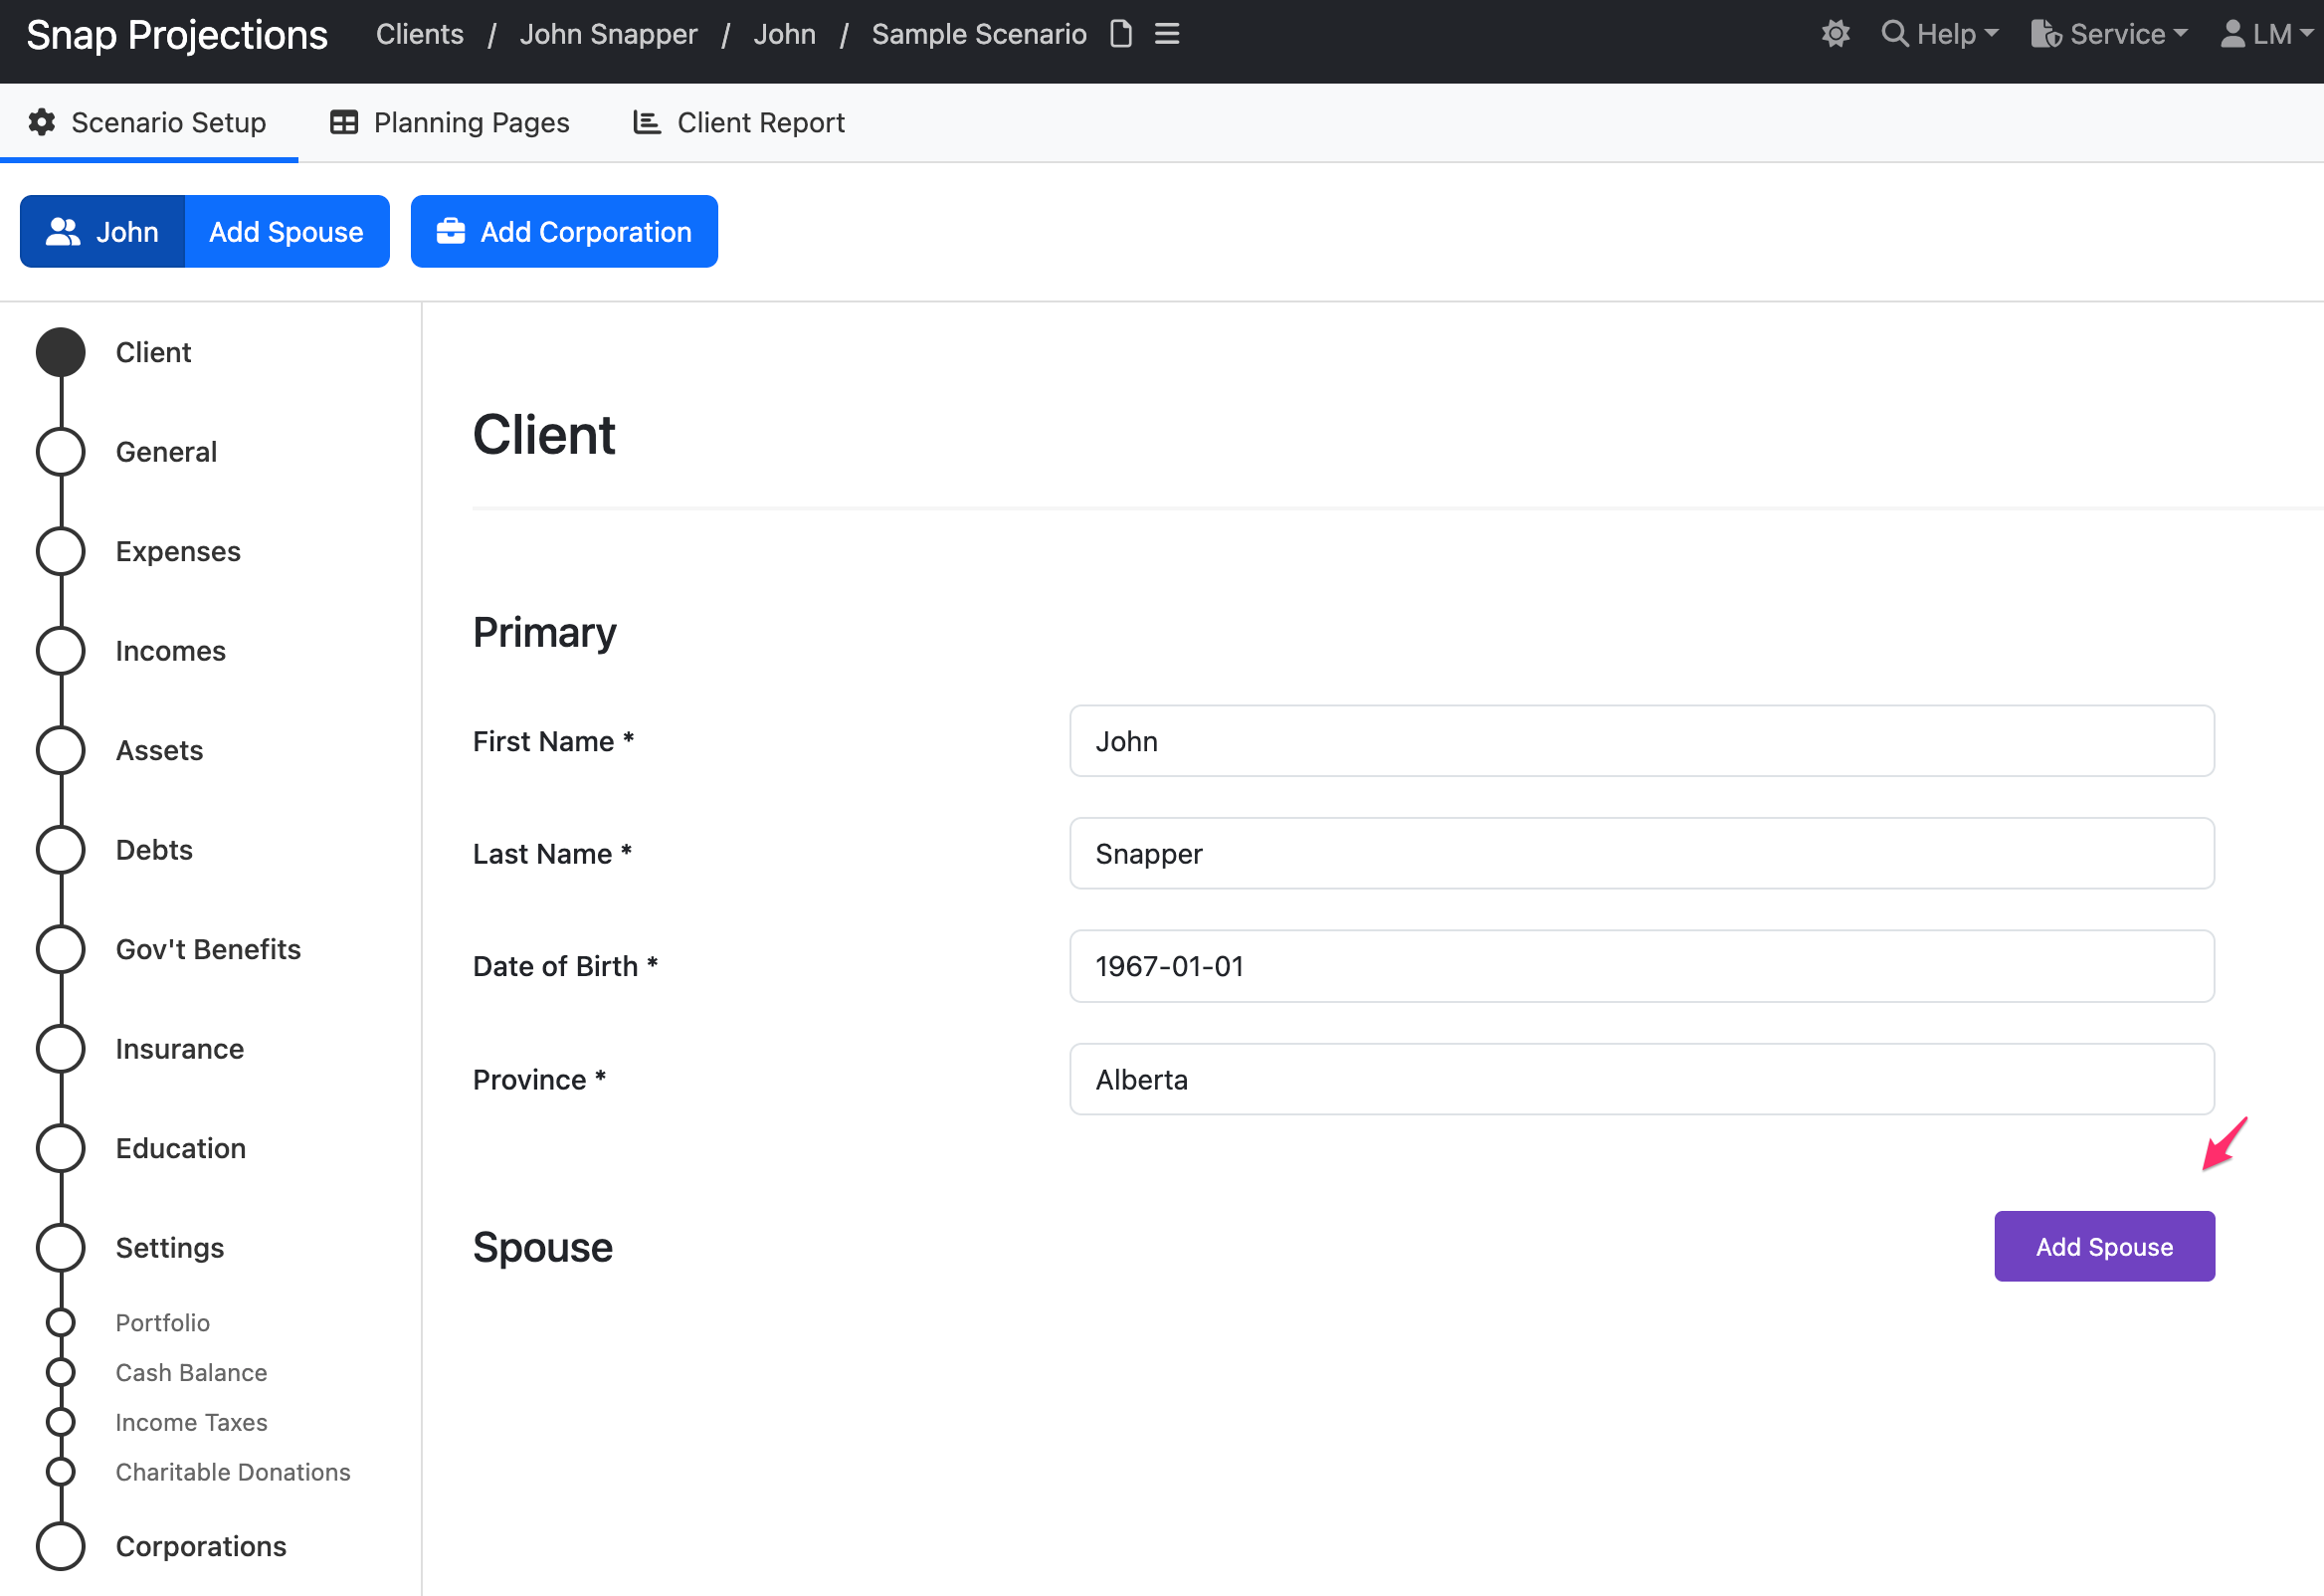
Once you click away from the text entry field or use the Tab or Enter keys, the data will be saved automatically. This is indicated by the green Saved indicator at the bottom of the page. You do not need to click this button to save your information, it will be saved automatically.

When the data has not been saved yet, you will see an Edited indication.

Click Next to continue to the next data entry page or select your desired next page by clicking it under the left navigation menu. We will follow the default order of data entry pages in this article.
- 3
-
Enter General Information
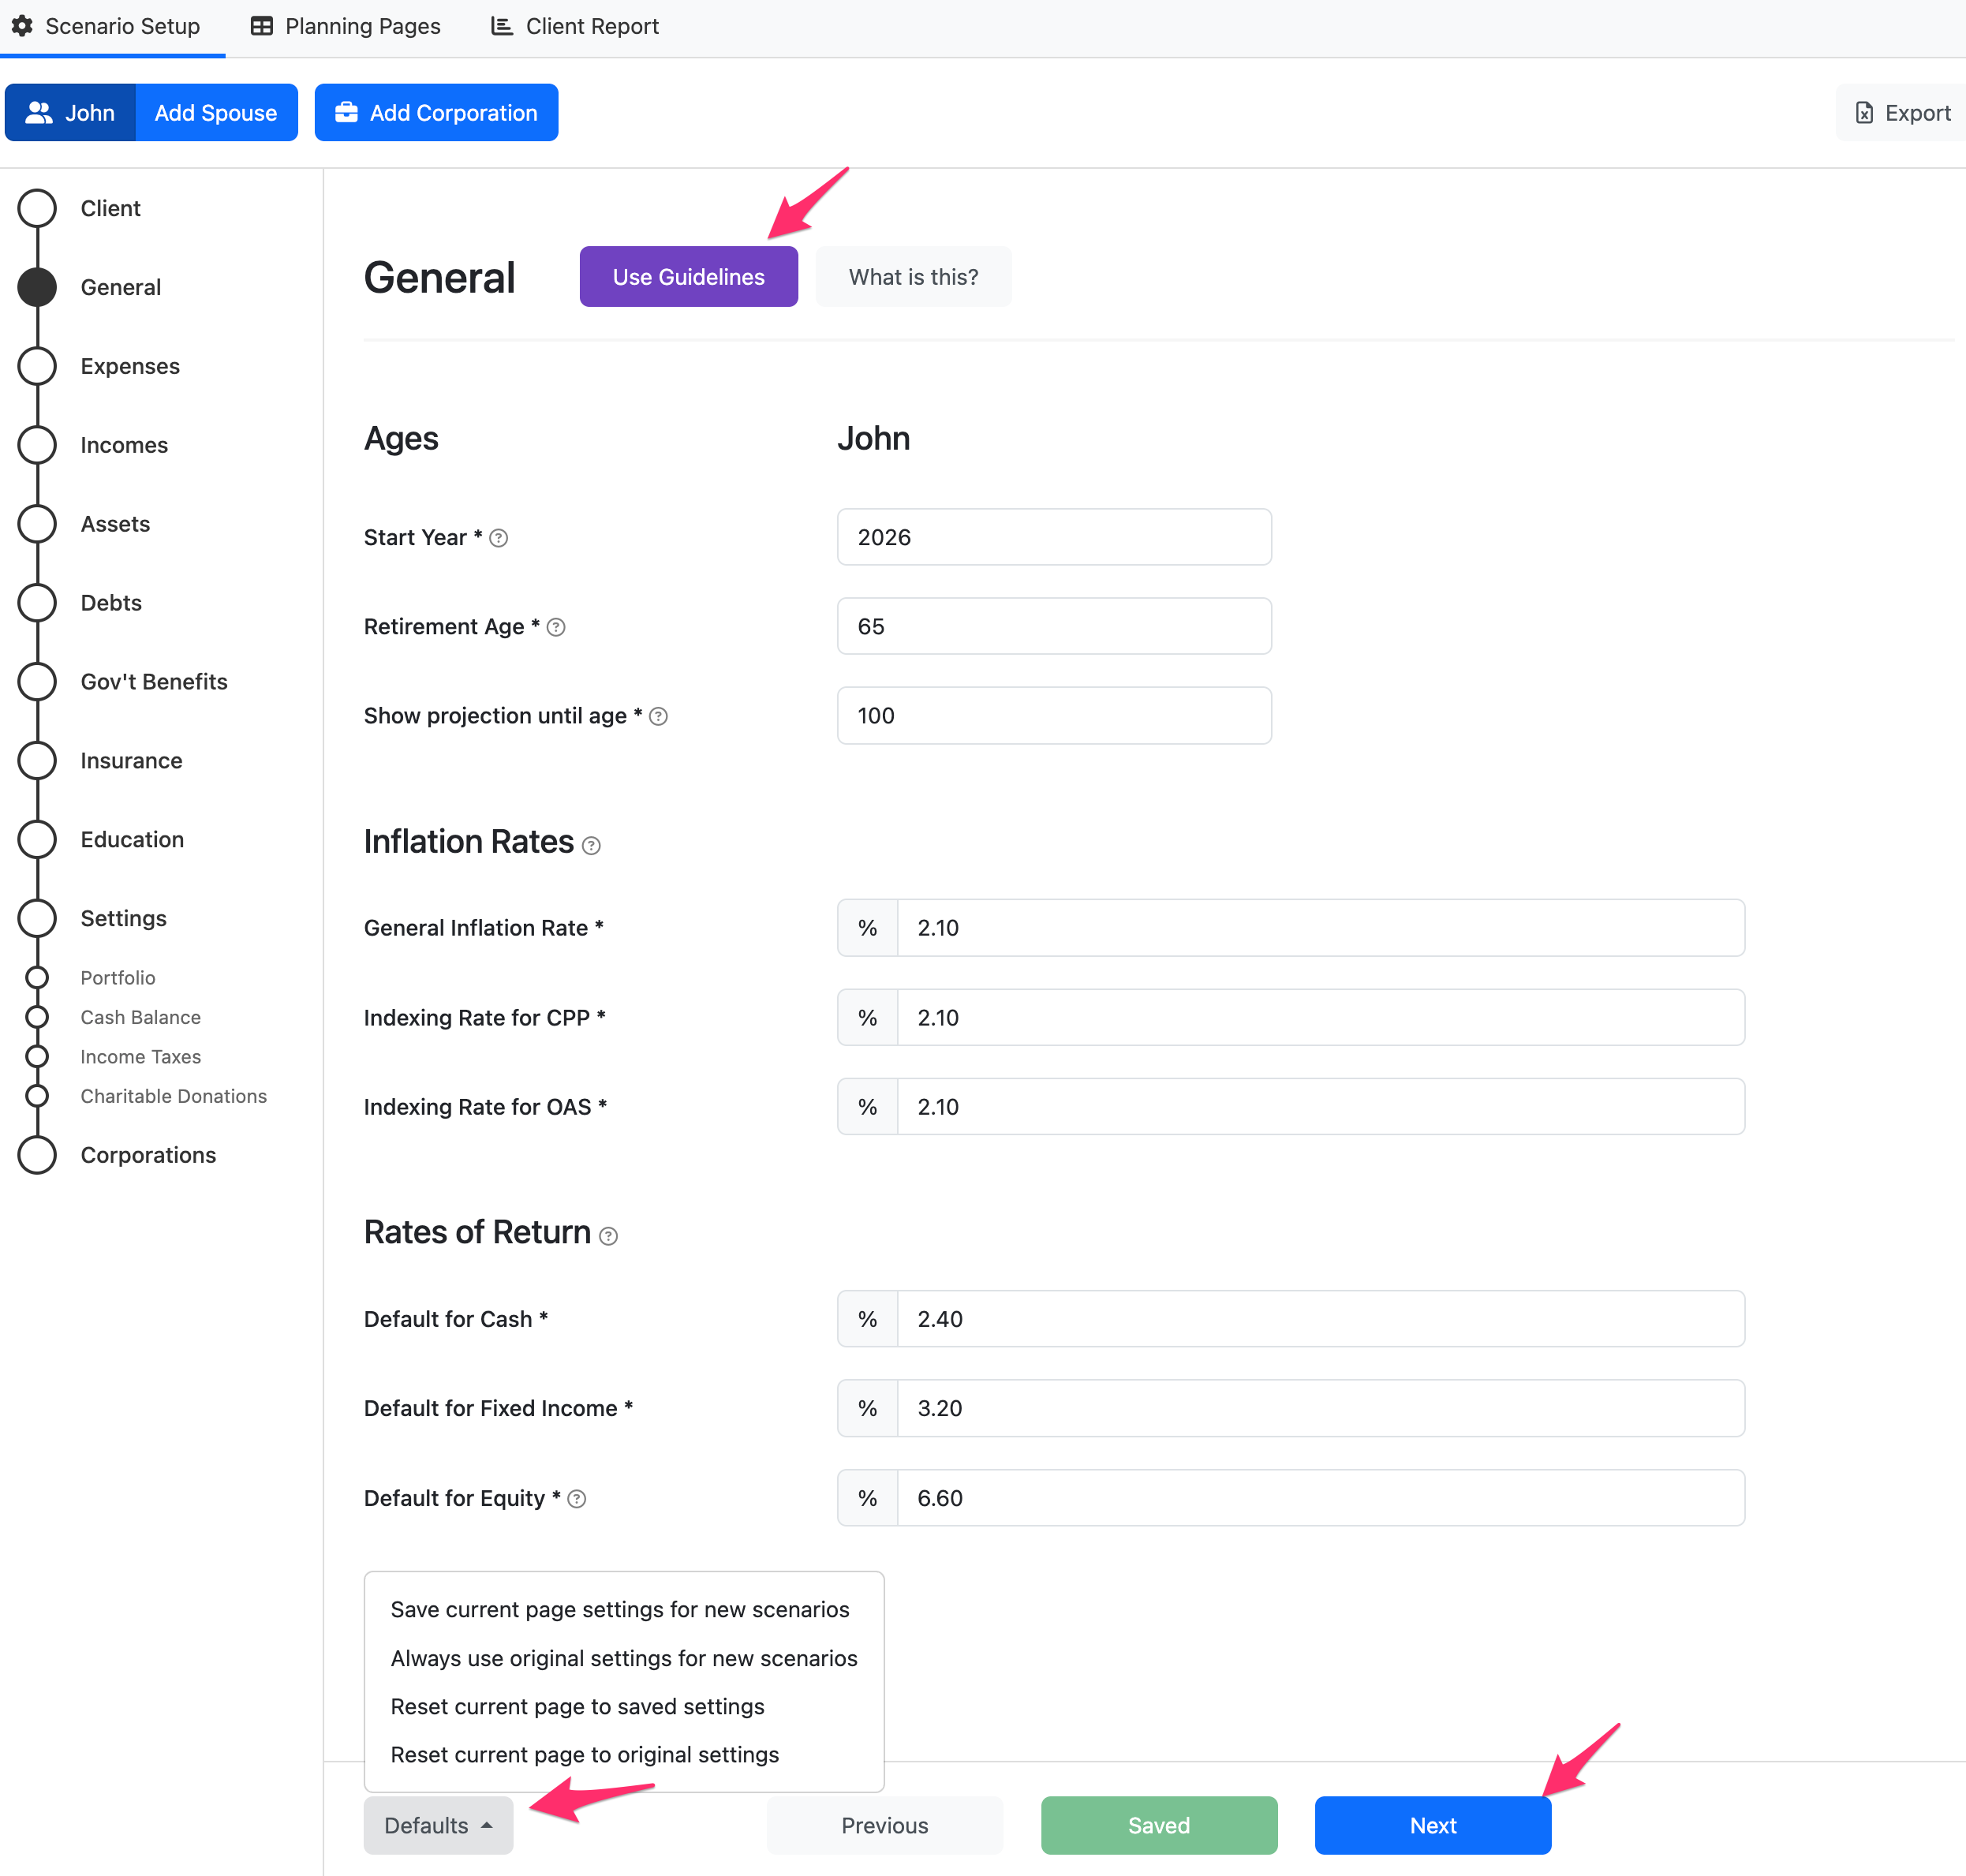
On the General page, you can review & modify the assumptions for this scenario. The settings include the Retirement age, Inflation Rates, and default Rates of Return on different asset classes.
Snap will use the Retirement Age to automatically stop employment income in the year before the client reaches this age. Employment income end-dates can be fine-tuned on the Incomes page.
If you click the Defaults button, you can save the current page settings and have them be used for NEW scenarios that you create. You can also reset the page to its original default or your default settings. The Use Guidelines button at the top of the page will import the Projection Assumption Guidelines from FP Canada.
Make sure to adjust the imported rates of return to account for specific product and portfolio management-related fees.
Note that you can start the projections as of January 1 of the current year or January 1 of the following year. Click Next to continue.
- 4
-
Enter Expenses
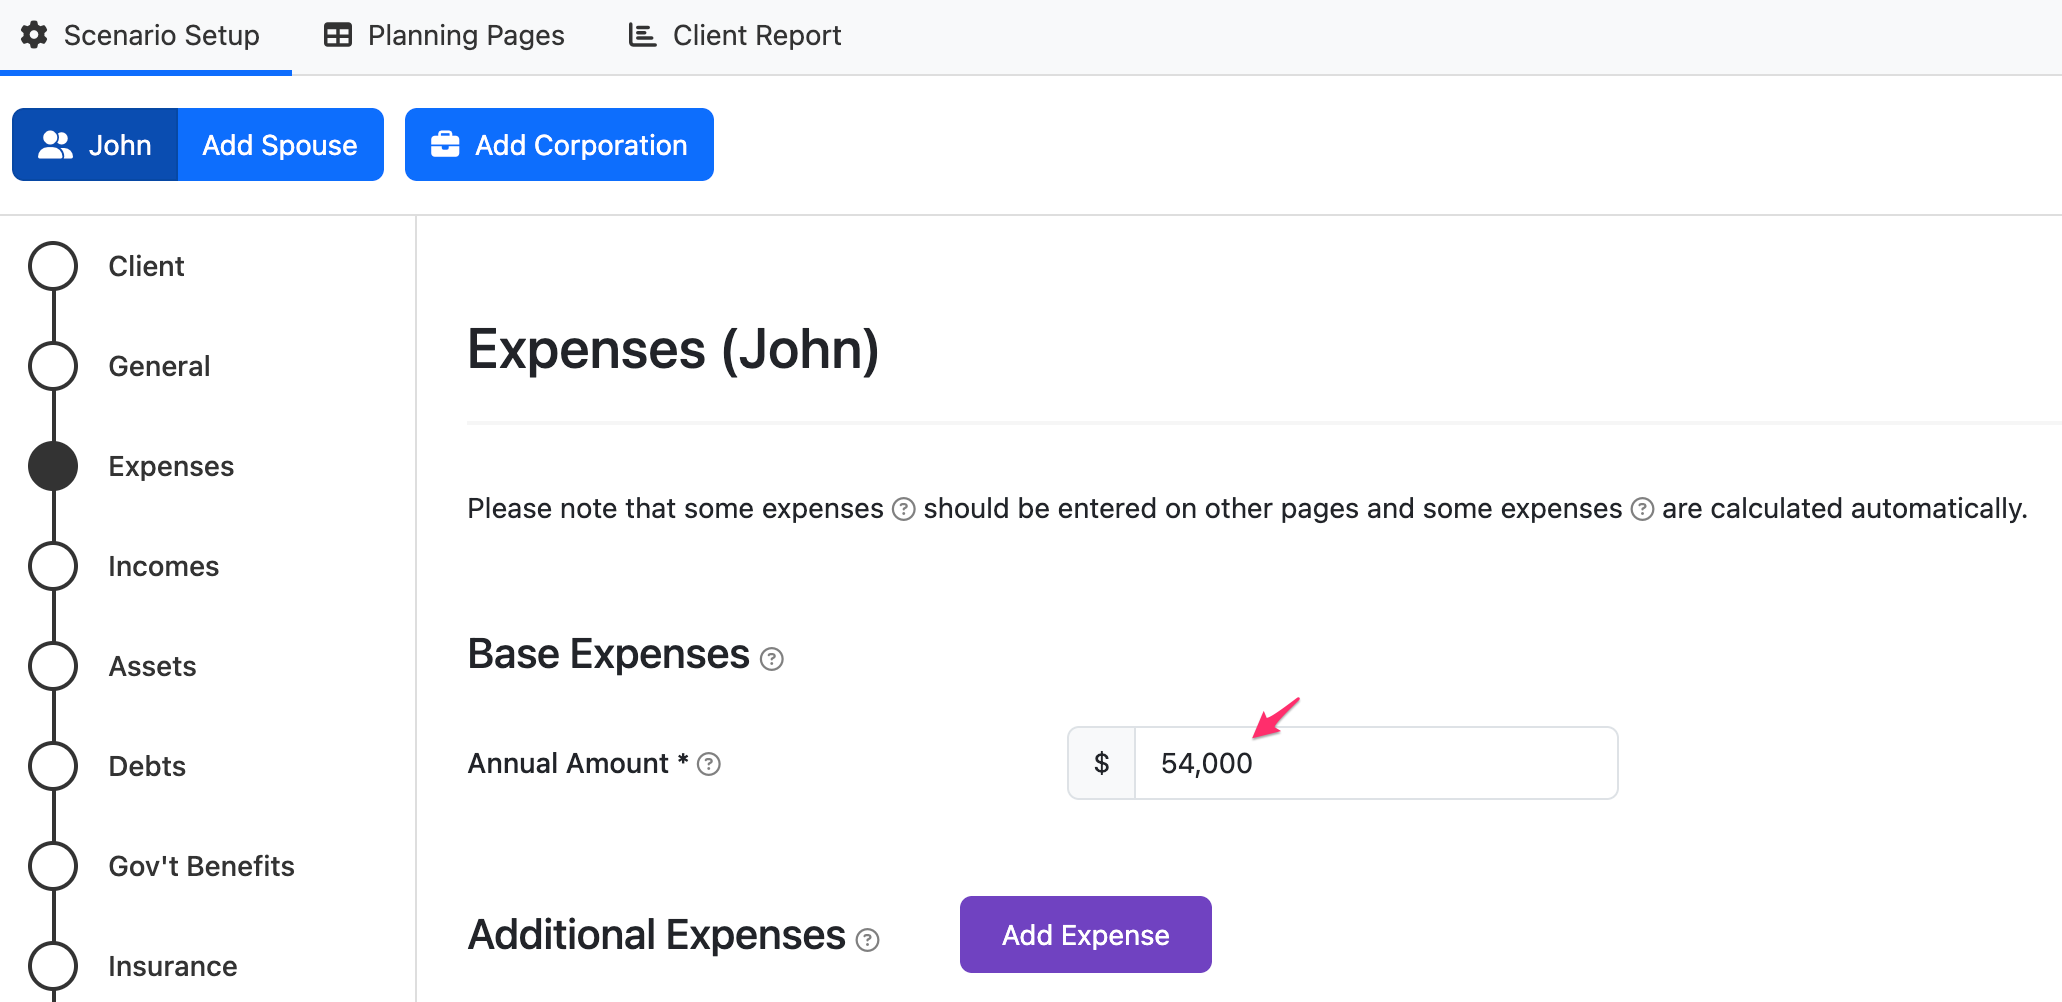
On the Expenses page, you can enter Base Expenses and Additional Expenses.
Base Expenses can be thought of as the minimum amount of annual after-tax spending that your clients need, excluding items entered on other pages such as debt payments, insurance premiums, savings contributions, etc. We think of Base Expenses as recurring lifestyle expenses (for example groceries, transportation, home maintenance, etc.).
Don't worry if you aren't sure what to enter here, leave the amount $0 and you can edit the value directly on the Planning page when you get there.
The amount entered here will be populated for every year starting at the client's Retirement Age or the plan's first year, whichever is later. For a couple, enter the Combined annual Base Expense value.
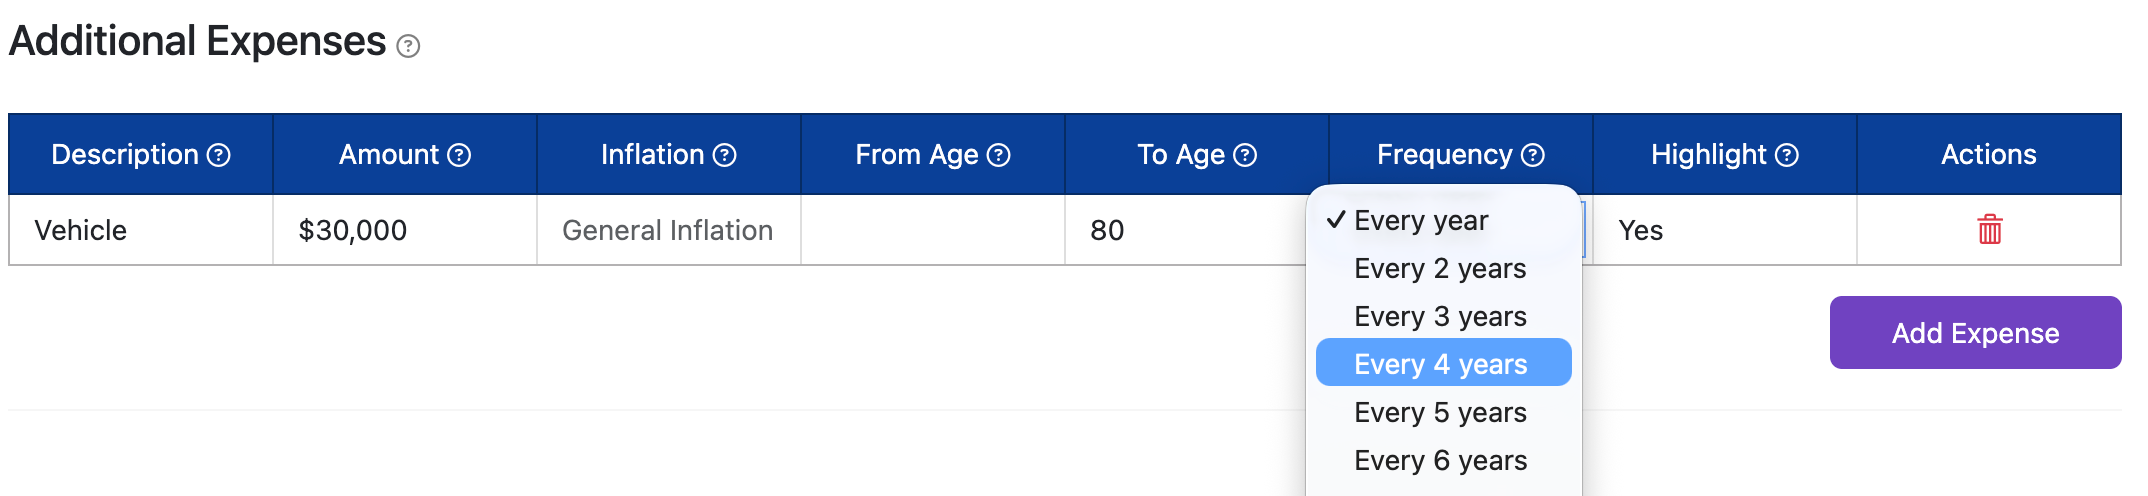
Additional Expenses
You can use the Additional Expenses table to enter one-time or recurring expenses, separate from the Base Expenses. These items typically include vehicles, travel, renovations, gifts to kids, etc.
Select Add Expense and then fill out the row for each expense. You can find further details on the data entry for Additional Expenses here.
Tip: Each header has a question mark you can hover your mouse over to see an explanation.
- 5
-
Enter Incomes
On the Incomes page, you can enter your client's annual employment income and add other income streams such as eligible and non-eligible dividends and defined benefit pension plans.
The Employment Income row will be pre-populated for you and all you need to do is enter the annual Amount, and adjust the Indexing if desired. If the From Age is blank, the income will apply starting in the first year of the projection.
Employment income will automatically show a To Age based on the last full year of income before the Retirement Age.
You can fine-tune the dates by selecting the settings icon in the From Age and To Age cells.
If the client has additional income, click Add Income to add another row to the Income table. Once you complete the information for that row, the information will be automatically saved.
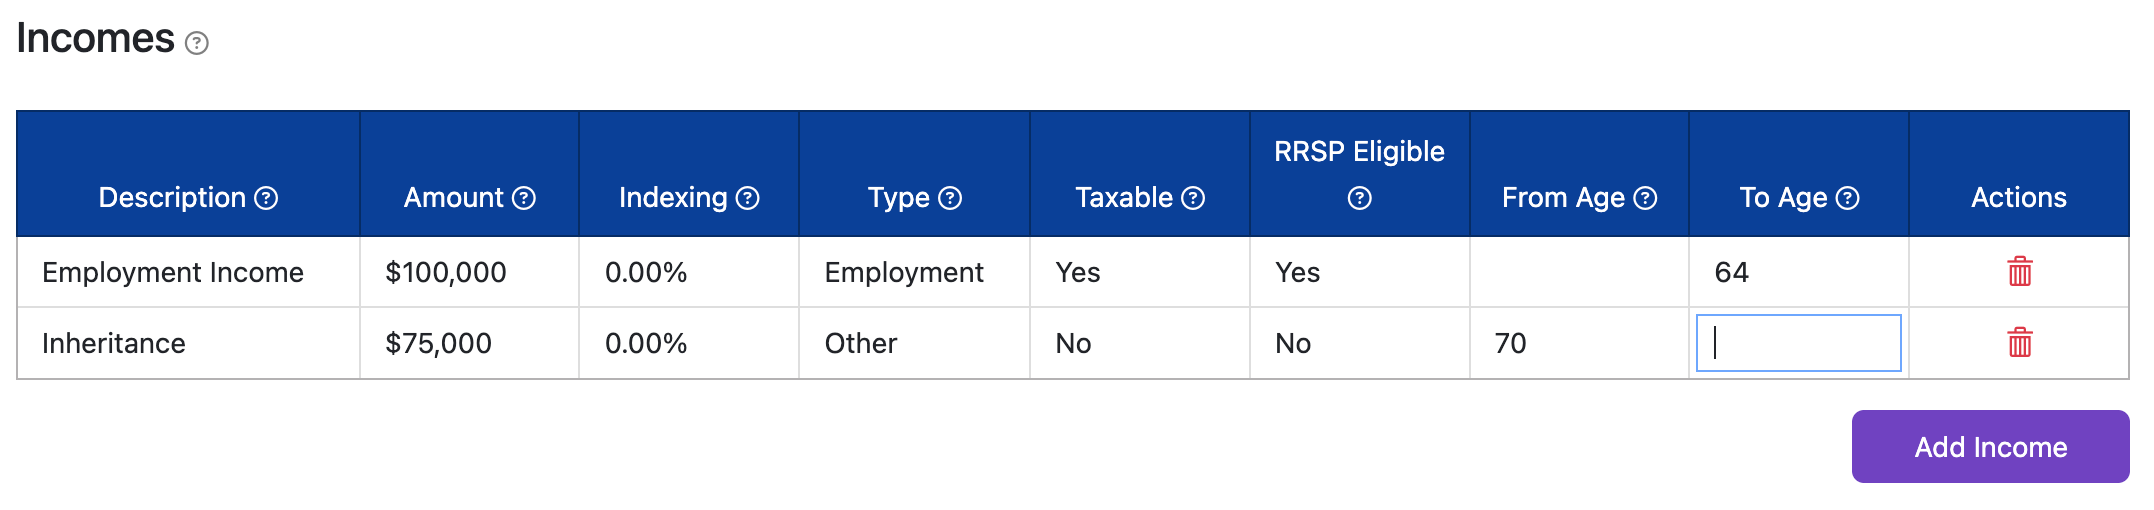
To enter a Joint Income, the Type must be set as Other. Snap will split the income evenly between the spouses and if one individual passes away before the other, the surviving spouse will receive the full income.
Add Defined Benefit Pension Plan (DBPP) information under the Pensions section if applicable, then click Next (at the bottom of the page) to continue to the Assets page.
- 6
-
Enter Assets
You can now click Add Financial Asset or Add Real Asset to enter details about the client's financial and real assets.
For the Financial Assets, make sure to complete the data entry for each row, including the Description, Value, Cost (for non-registered accounts), Type, and percentage allocation to Cash, Fixed Income, and Equity. The Total RoR will be calculated for you and once complete, the row will be saved automatically. You can update the individual RoR percentages for each Financial Asset individually.
As a best practice, enter a non-registered account (or RRSP and TFSA) even if there is a $0 value. This allows the software to contribute to the accounts in the future and avoid using the Cash Balance. It also allows the Recommended Savings feature to use this account to reach a retirement goal. Snap creates a default non-registered account with an initial value of $0 allocated to 100% Cash which can be edited.
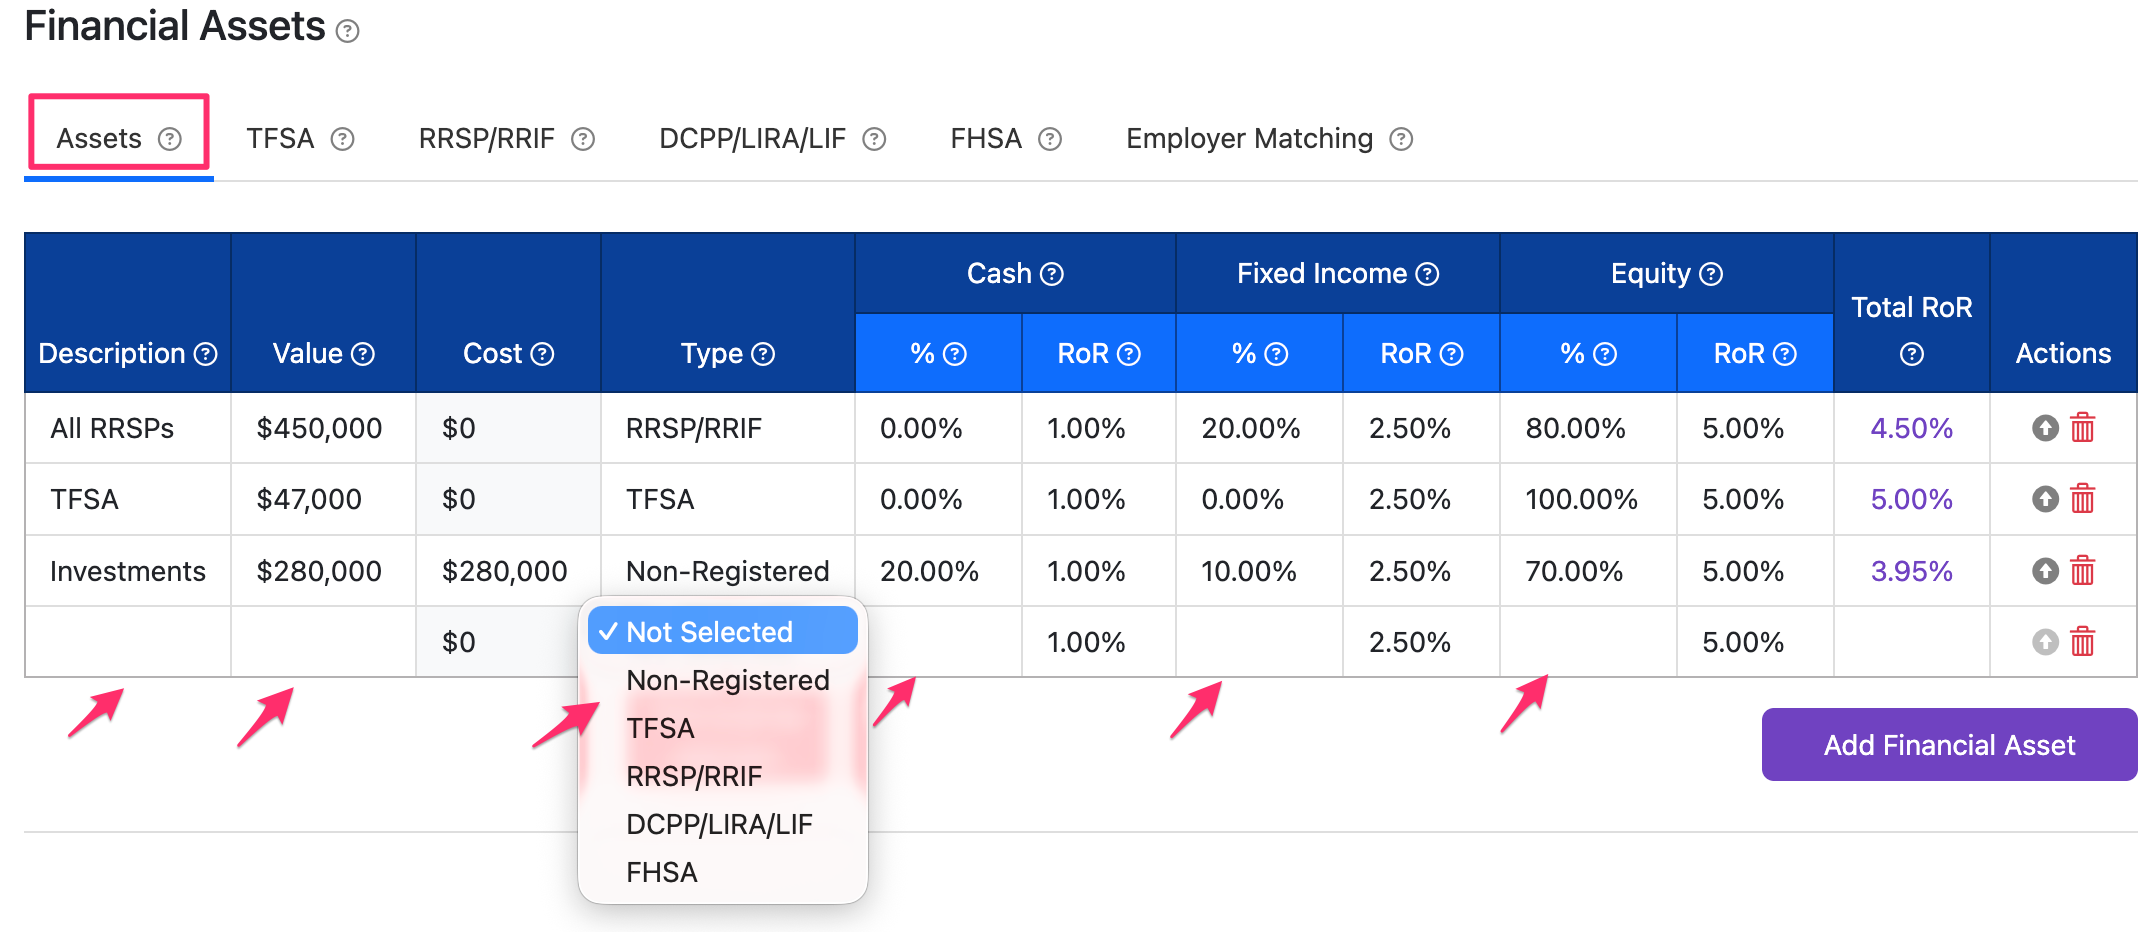
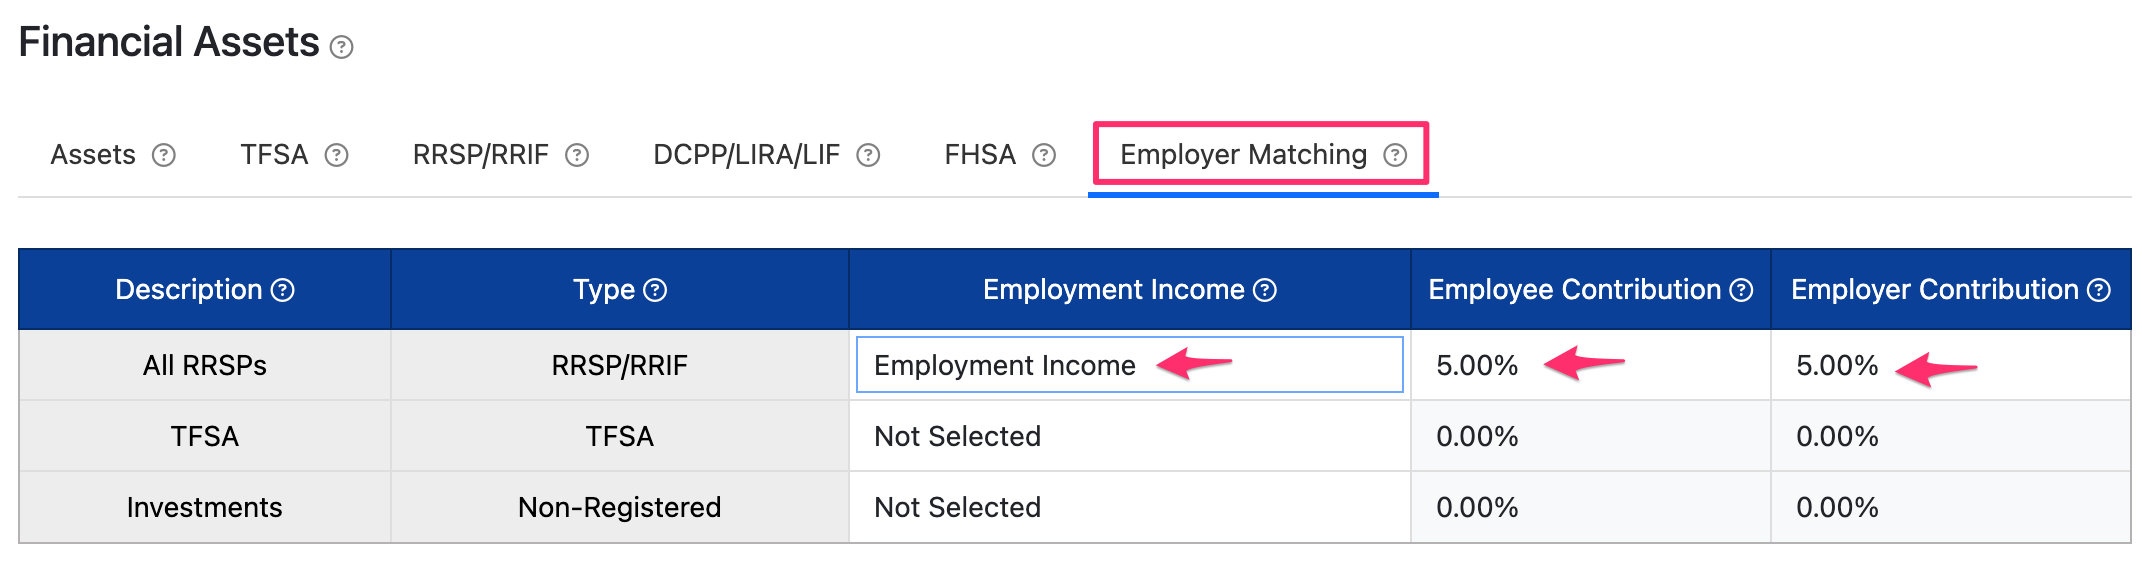
Asset balances are the beginning-of-the-year values for the first year of projections. For Group Assets and Defined Contribution Pension Plans (DCPP), click the Employer Matching tab to set up employer and employee annual contributions as a percentage of Employment Income.
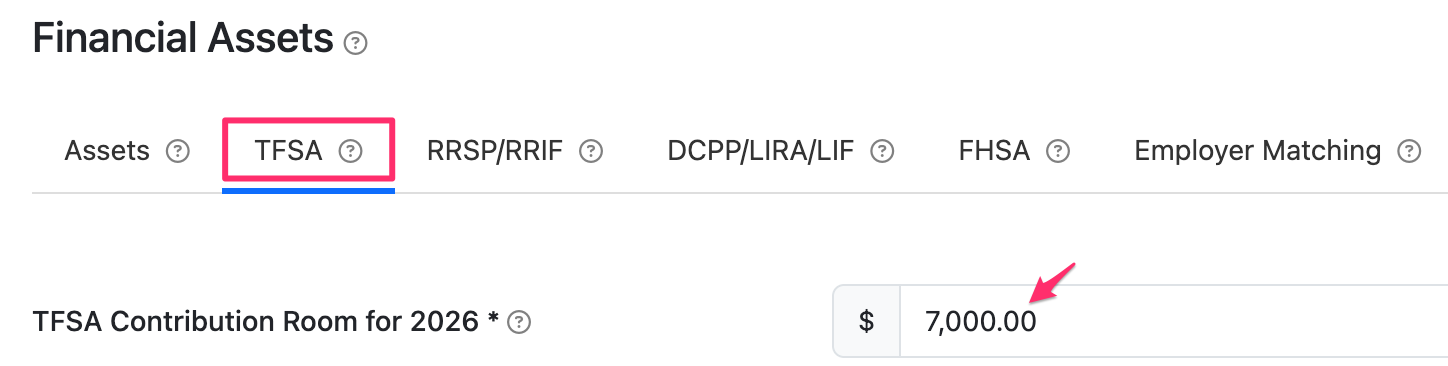
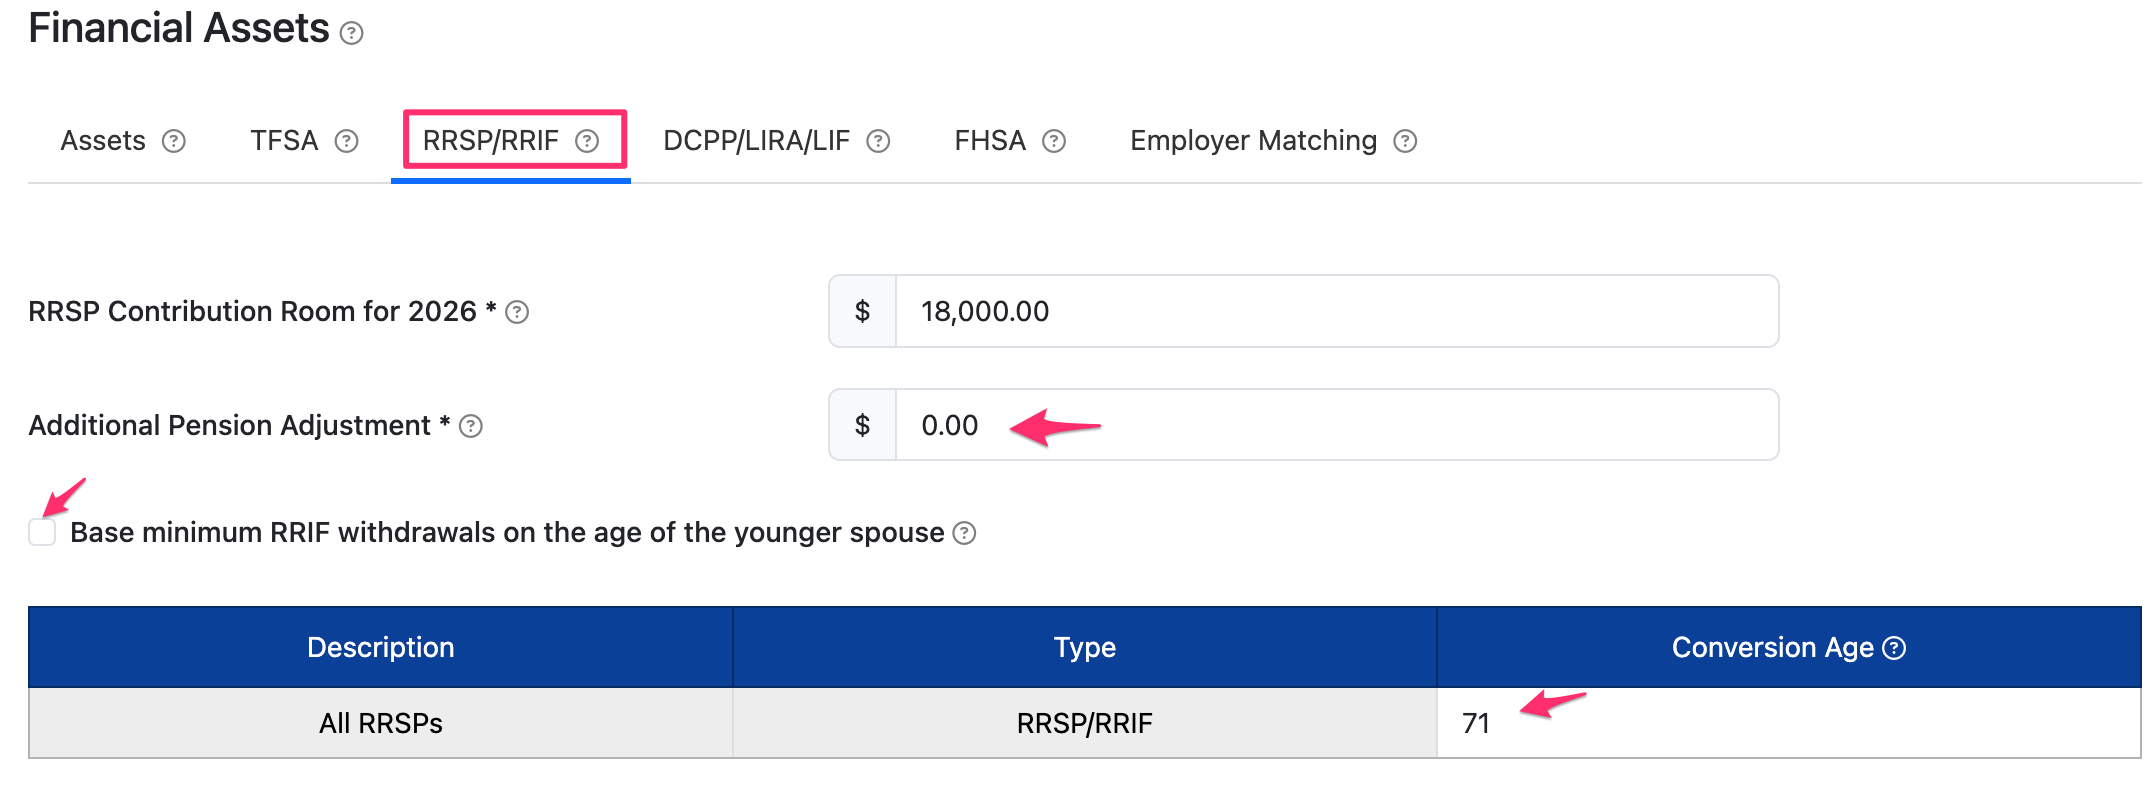
Click the TFSA tab and/or RRSP/RRIF tab to enter the client's current Contribution Room.

Contribution Room Default Assumptions:
- RRSP contribution room for the first year of your projections will be calculated as 18% of any RRSP-eligible income entered on the Income page during the initial data entry. (For example, $18,000 when the employment income entered was $100,000.)
- TFSA contribution room for the first year of your projections is set to the maximum TFSA contribution room for that year only. (For example, $7,000 in 2026.)
Detailed steps to update these values are outlined in this article: Unused RRSP and TFSA Contribution Room.
Click the RRSP/RRIF tab to set the Conversion Ages, Base the minimum withdrawals on the age of the younger spouse or add a Pension Adjustment for DBPPs.
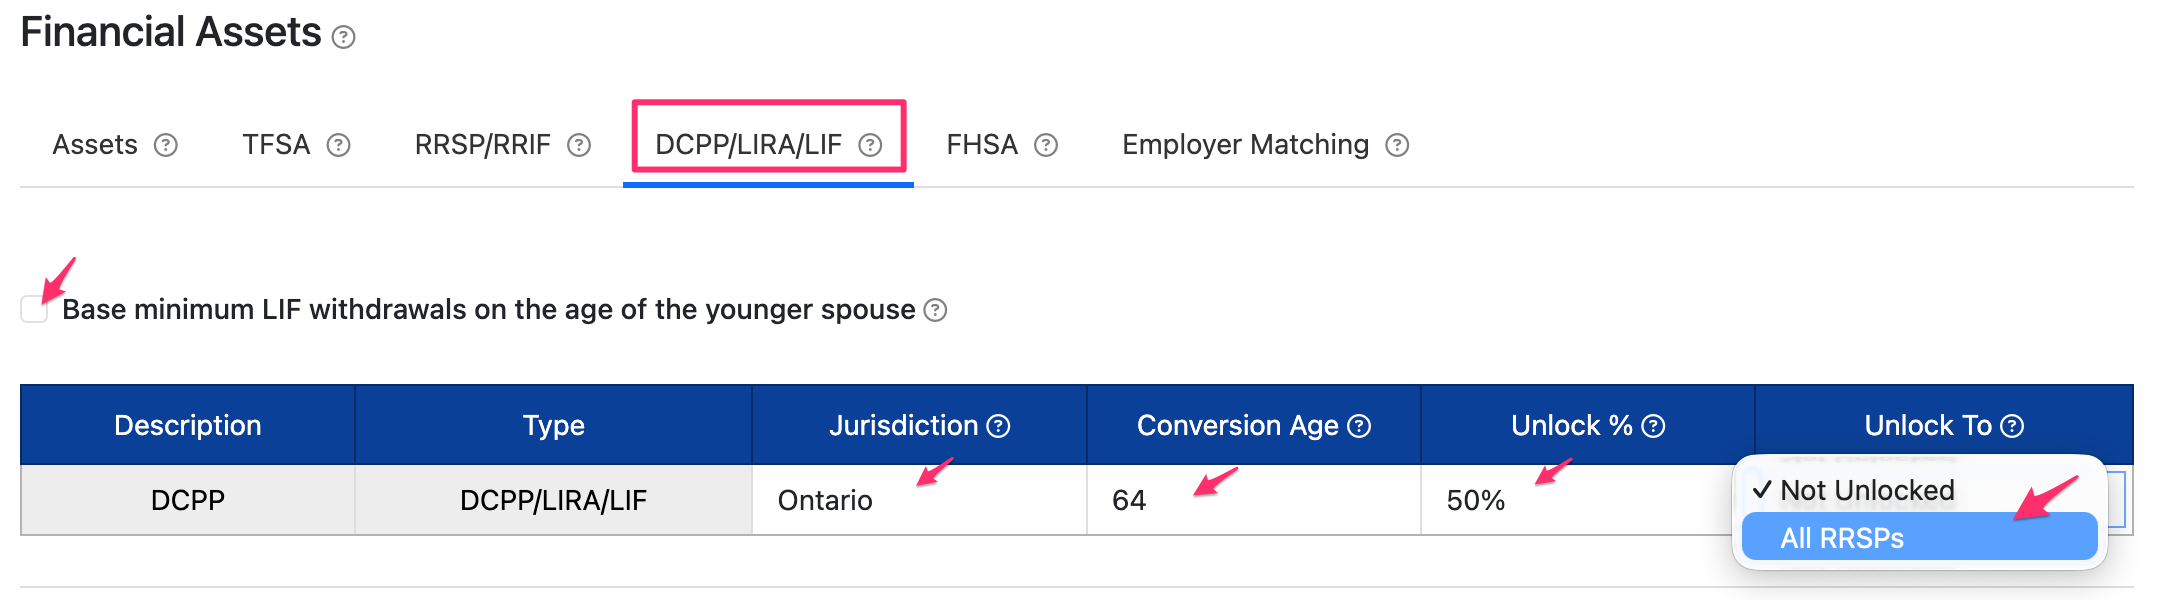
Click the DCPP/LIRA/LIF tab to set the Conversion Ages, Base the minimum withdrawals on the age of the younger spouse, set the Jurisdiction, or indicate Unlocking preferences.
Click the FHSA tab to adjust the Opening Age, available Carryforward Room, and Lifetime Contributions. Select a Real Asset as the First Home purchase. This allows Snap to determine the account closure requirements and Qualifying Withdrawals. Additional details on each of these settings are available in this article: First Home Savings Account (FHSA).

- 7
-
Enter Debts
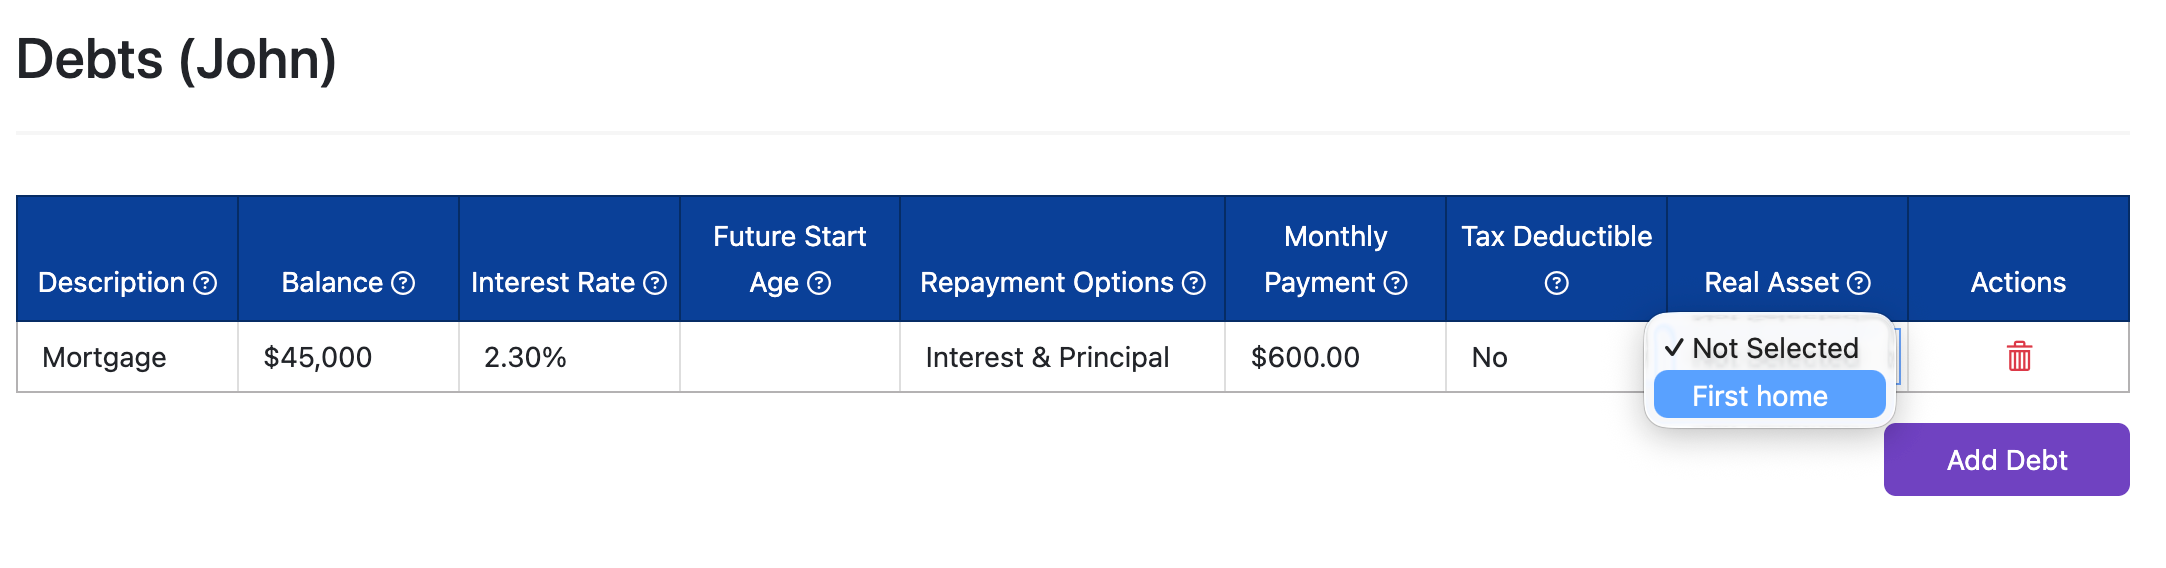
On the Debts page, you can add various debts. Indicate the Balance owing as of the start of the year, the Interest Rate, Repayment Options, the Monthly amount, whether the interest is tax-deductible, and whether this debt is linked to a Real Asset in your projections. If linked, and the Real Asset is sold during the projections, any remaining debt at that time will be automatically paid off.
- 8
-
Enter Government Benefits
Under Scenario Setup -> Gov't Benefits, you can adjust the default CPP/QPP and OAS information including the starting age for the benefit, the annual amount and indexing rate. Snap assumes your clients will receive the national average for CPP/QPP benefits and 100% of OAS, both indexed with inflation; however, this may not be the case for your particular scenario.
You can read more about the defaults used by Snap and how to make changes in these articles:
- 9
-
Enter Additional Scenario Setup information as desired
The next few Scenario Setup pages include Insurance, Education, Corporations, and Settings. If these pages apply to your clients you can input data now, or return to add the information later.
To learn more about these pages, please refer to these pages:
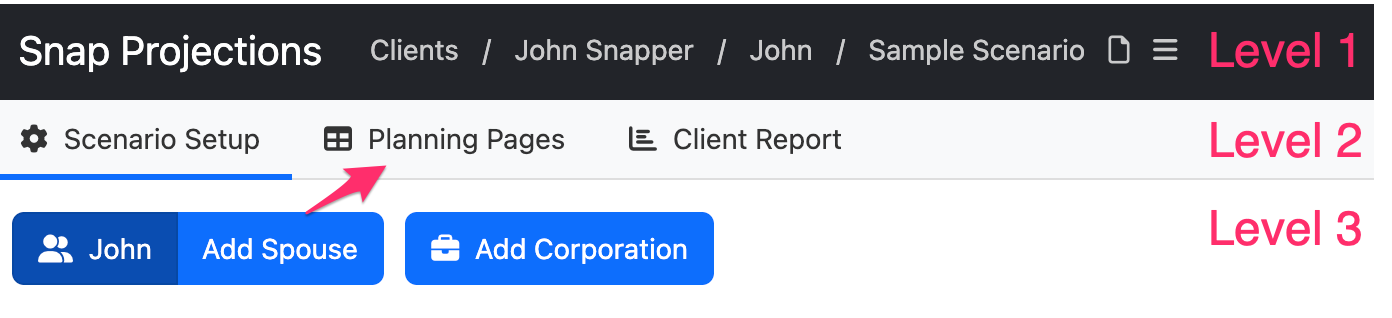
To go directly to the Planning page at any time, click Planning Pages in the 2nd level menu at the top left.
- 10
-
The Planning page - Enter Savings Contributions
There are various Planning pages that you can access. Use the 3rd level menu to select the appropriate Planning page to view and edit. If your projections are for a couple, you will see 3 Planning pages: the Combined page, the Client's page, and the Spouse's page. There is also a Planning page for each corporation in your projections. You will do most of your editing on the individual Planning pages. Any values that are coloured blue or purple indicate that you can click them to perform an action such as editing the value, indexing the value over time, and viewing details about that value.
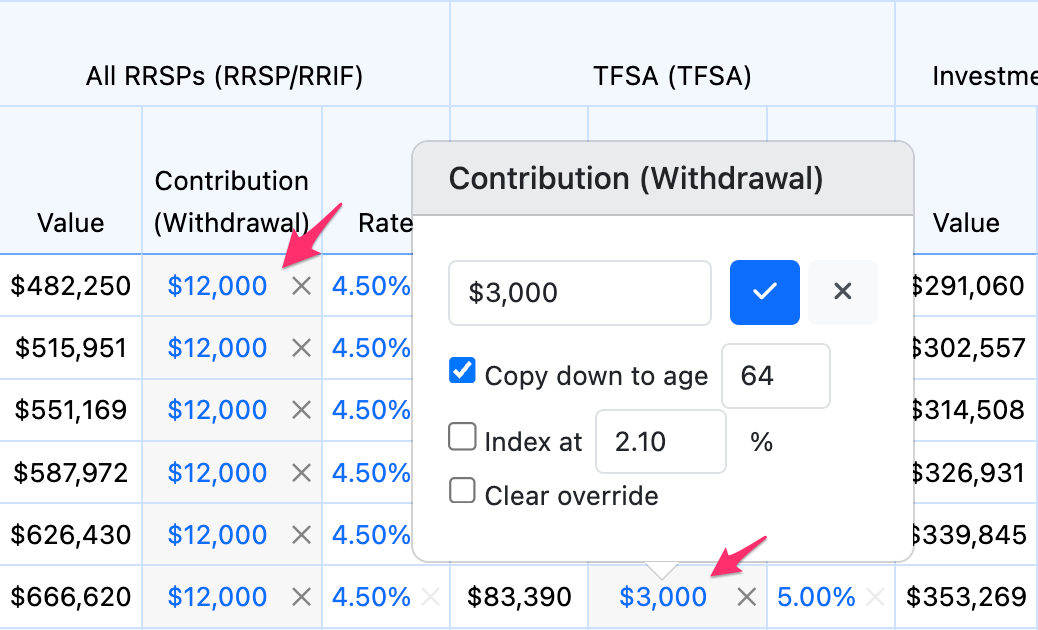
To learn how to enter specific contributions or withdrawals, please review this article: Editing Values on the Planning page.
- 11
-
Adjust Base Expenses if desired
If you haven't yet entered a value for Base Expenses for your clients, the next important step is to do so directly on the Planning page.
This step is very important because Snap will assume that the client or couple is spending $0 on their lifestyle until you fill in the desired Base Expenses amount. Enter this value on the Combined Planning page for a couple's projections.
Before the Cash flow management (CFM) Start Age (the client's retirement age by default), the software will assume that all surplus cash is spent. The Base Expenses column displays the remaining cash that is available after any savings contributions are made, taxes are paid, and any other expenses entered into the projections are paid (such as insurance premiums and mortgage payments). Youcan only enter a desired Base Expenses amount once the CFM Start Age has been reached in the projections.
In the year where you want to start entering the client's desired lifestyle spending (after-taxes), ensure that the radio button under the CFM Start Age column is selected. The radio button indicates the year that automatic cash flow management (CFM) starts.
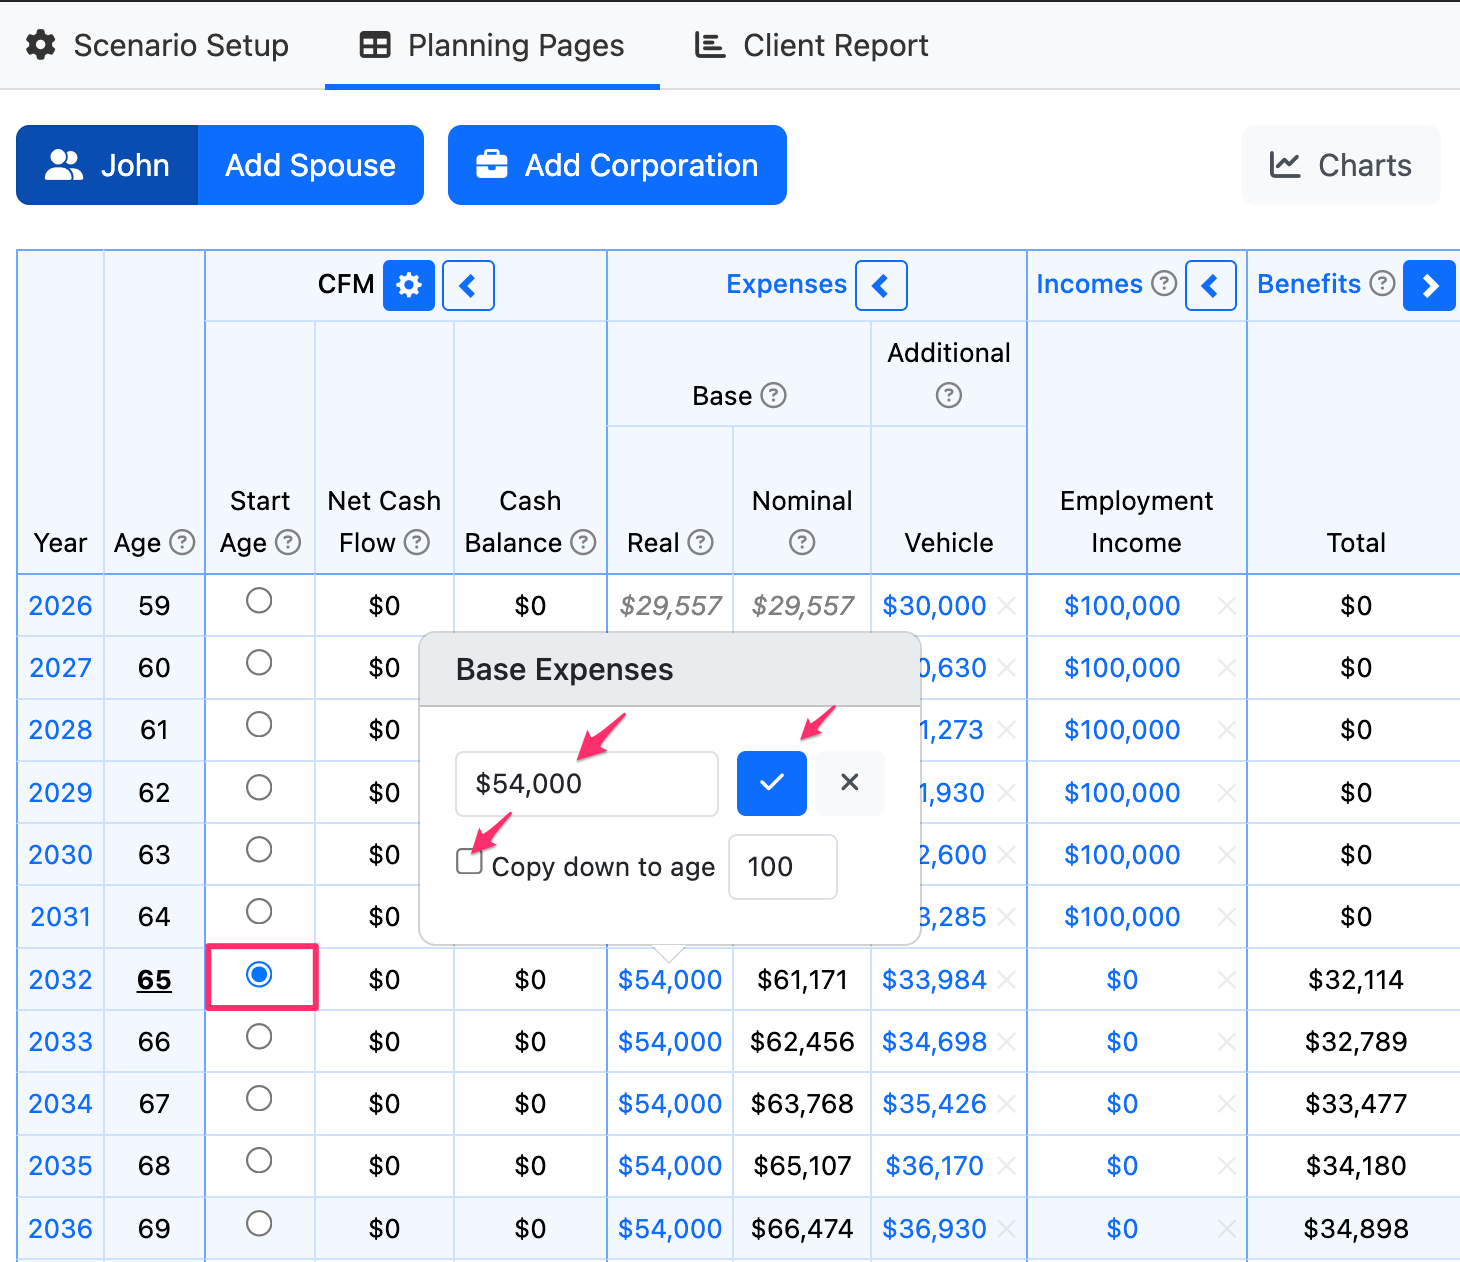
To enter the Base Expenses annual values, click the first blue value in the Real dollar column and a pop-up window will appear, as shown above. Enter the desired amount in the text box and copy this down to the correct age. Click the blue checkmark to save this entry. Do not include any expenses in the Base Expenses value that have already been entered into the projections such as contributions to various accounts, mortgage payments, insurance premiums, etc. You may wish to review how the cash flow is calculated in Snap and the default logic used for automatic cash flow management.
For a couple's projections, enter the joint Base Expenses on the Combined Planning page and Snap will automatically allocate a portion of this spending to each spouse.
- 12
-
Run the Scenario or try the Recommendations
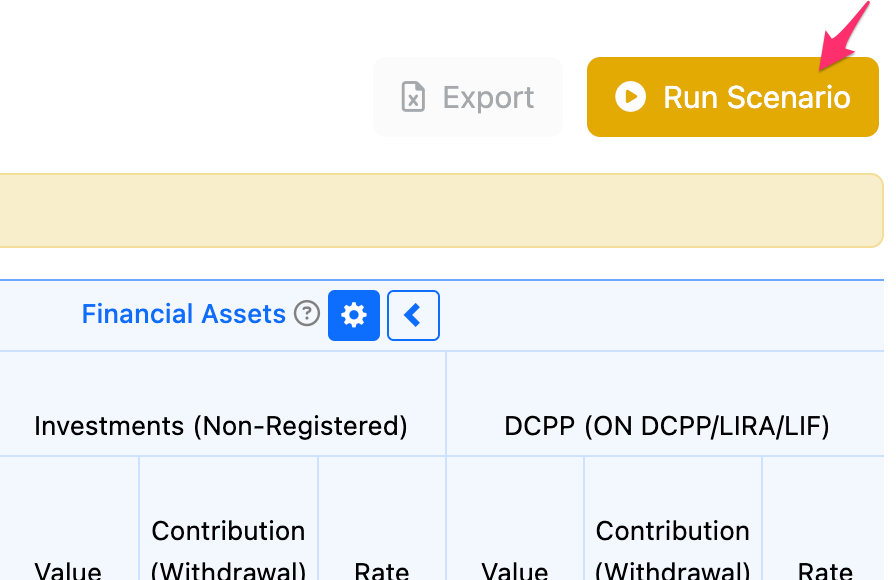
Click Run Scenario to view the results of this data input. The Run Scenario button is highlighted in orange when the scenario inputs have changed and the scenario needs to be re-run for accurate results.
At this point, you can also choose to explore our Recommendations features.
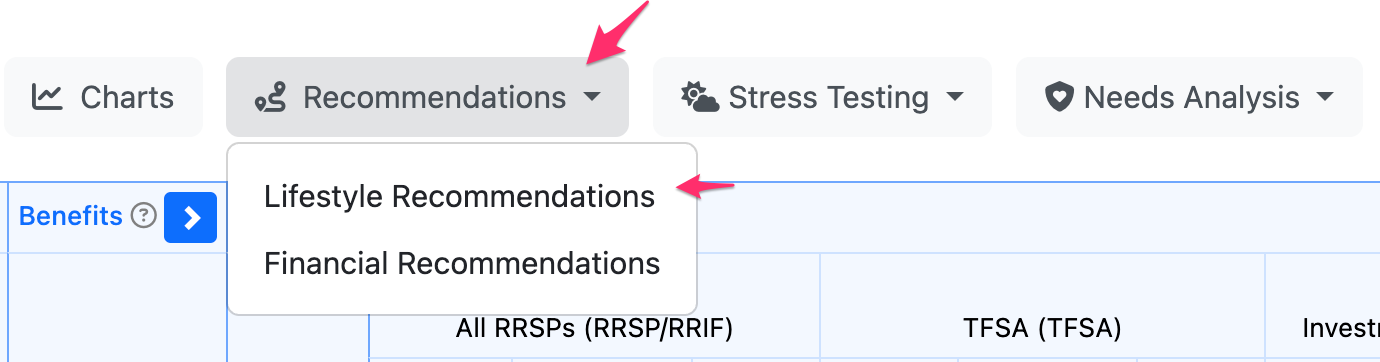
The Lifestyle Recommendations modal provides information about the client's Retirement Goal, whether it's over or underfunded, and ways to make it fully funded through adjusting their Retirement Age, Spending, or Savings.
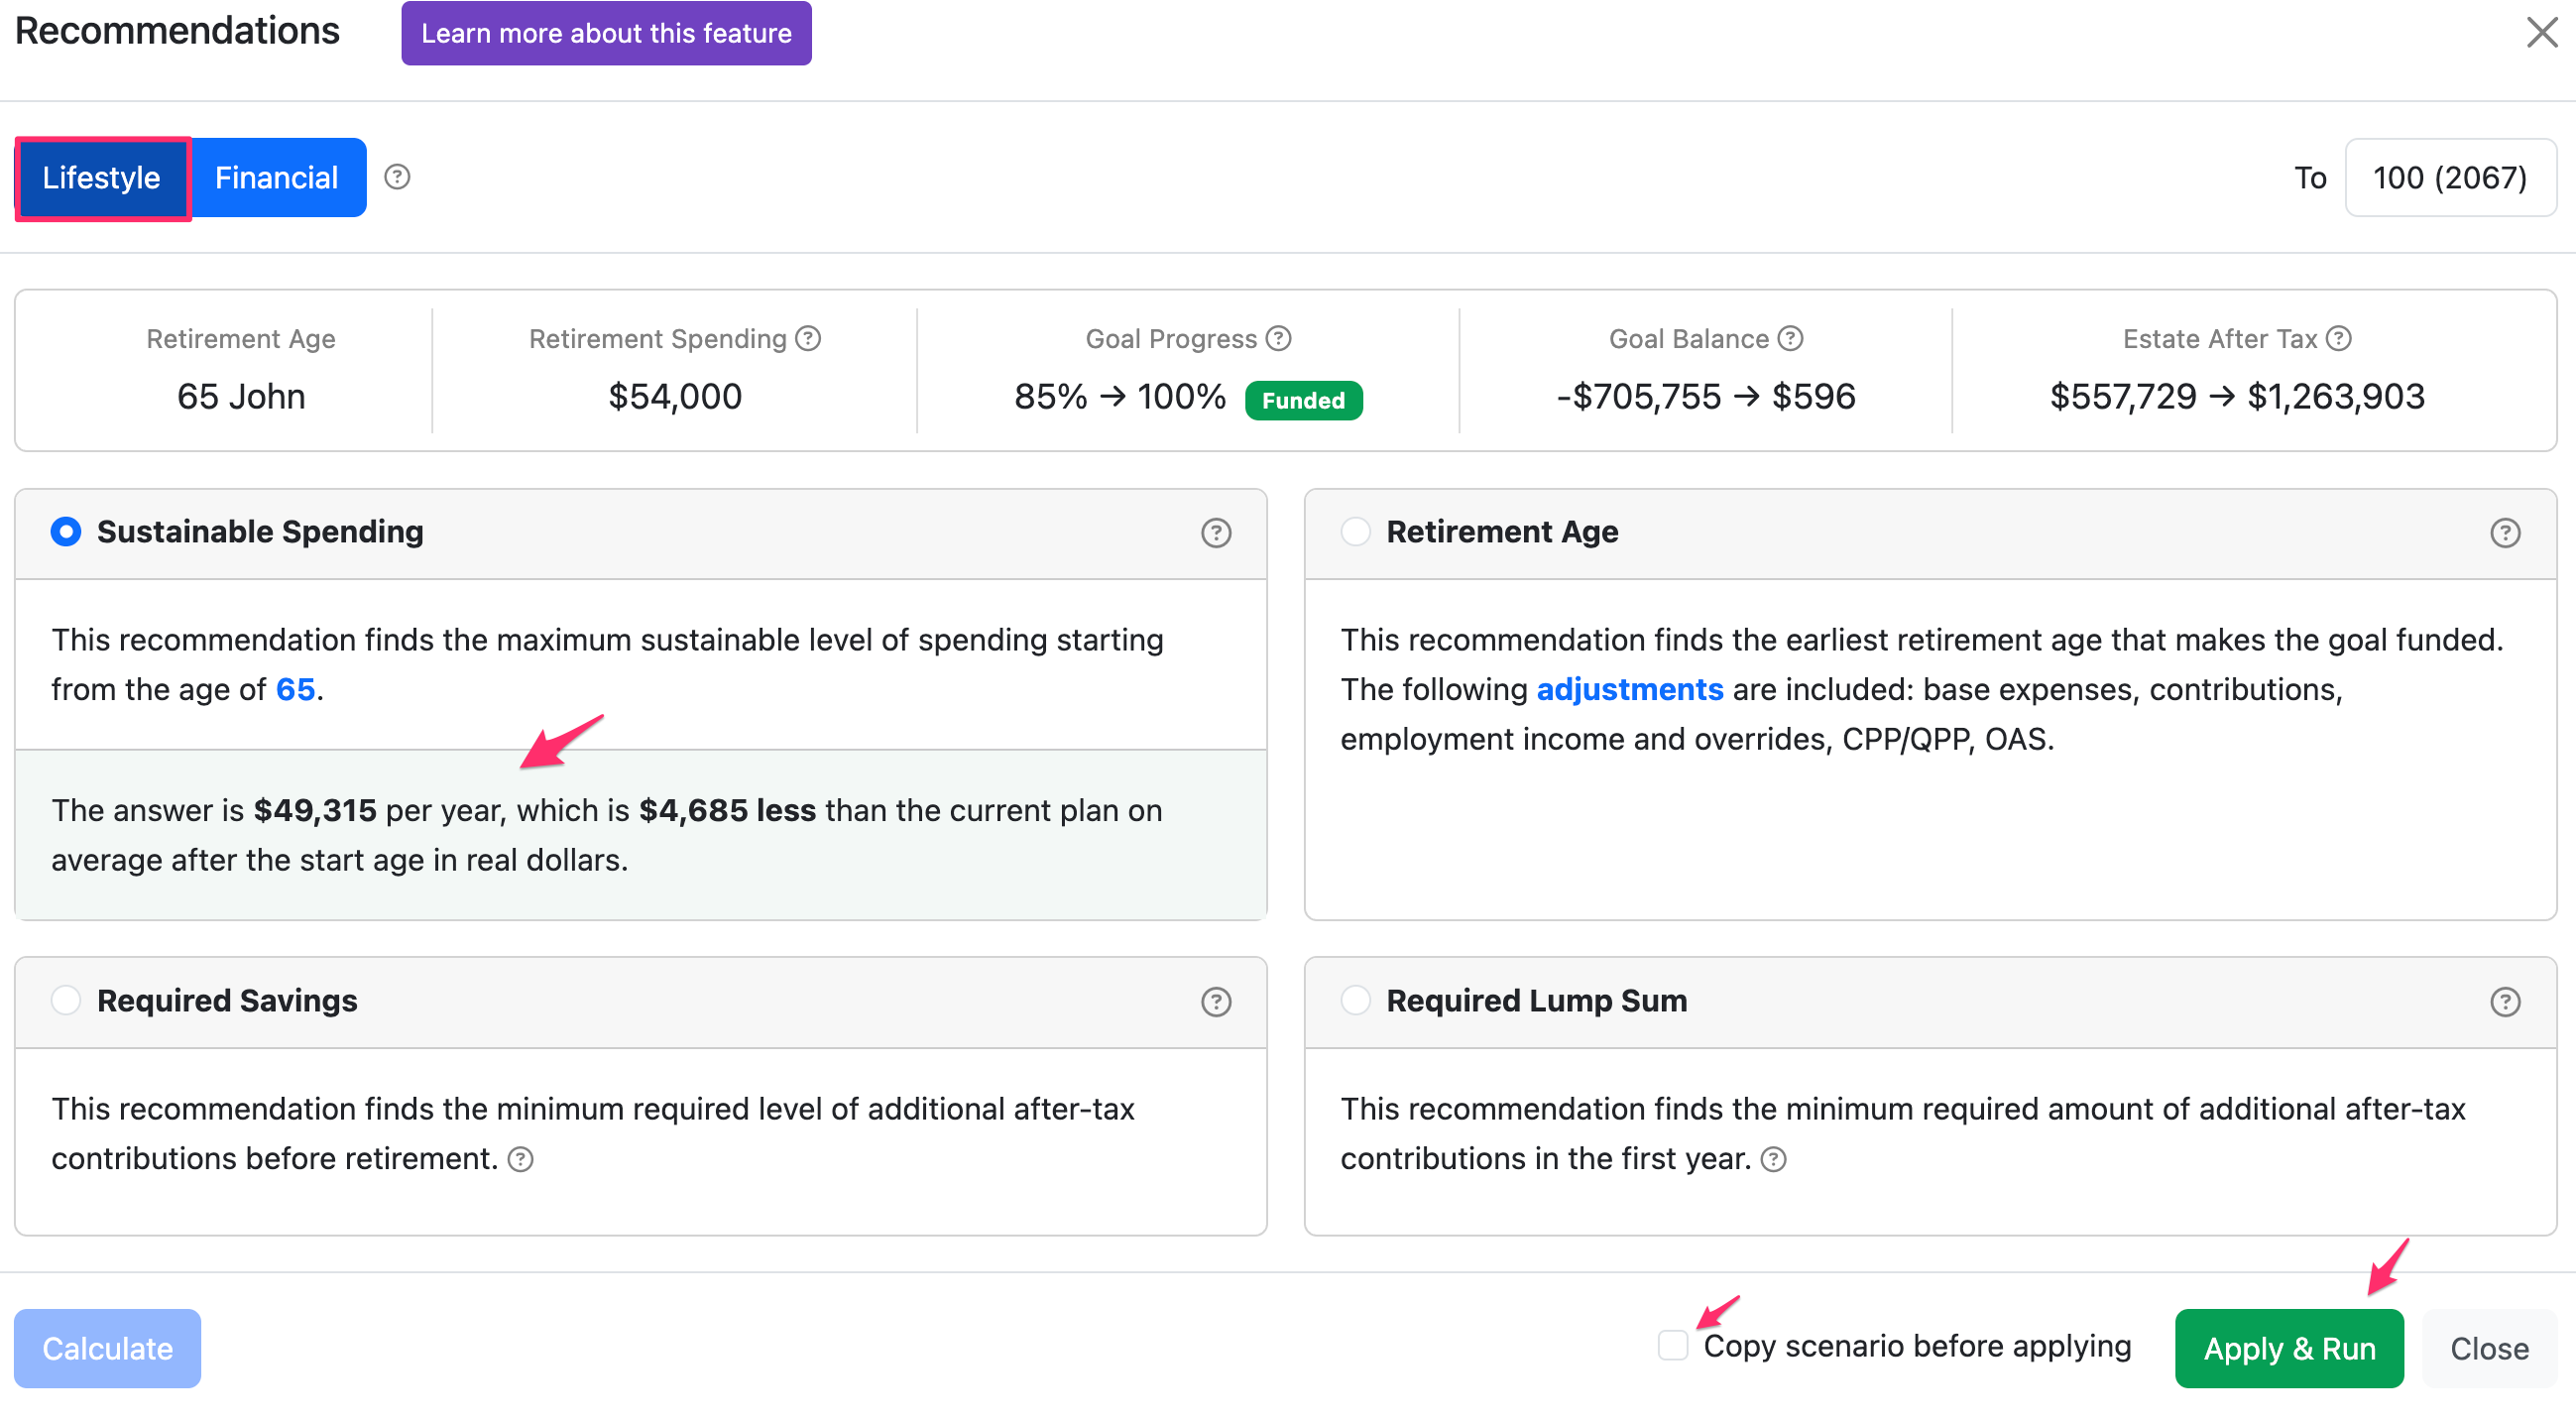
To see what changes would fully fund their goal, select Calculate for any of the 4 adjustment tiles.
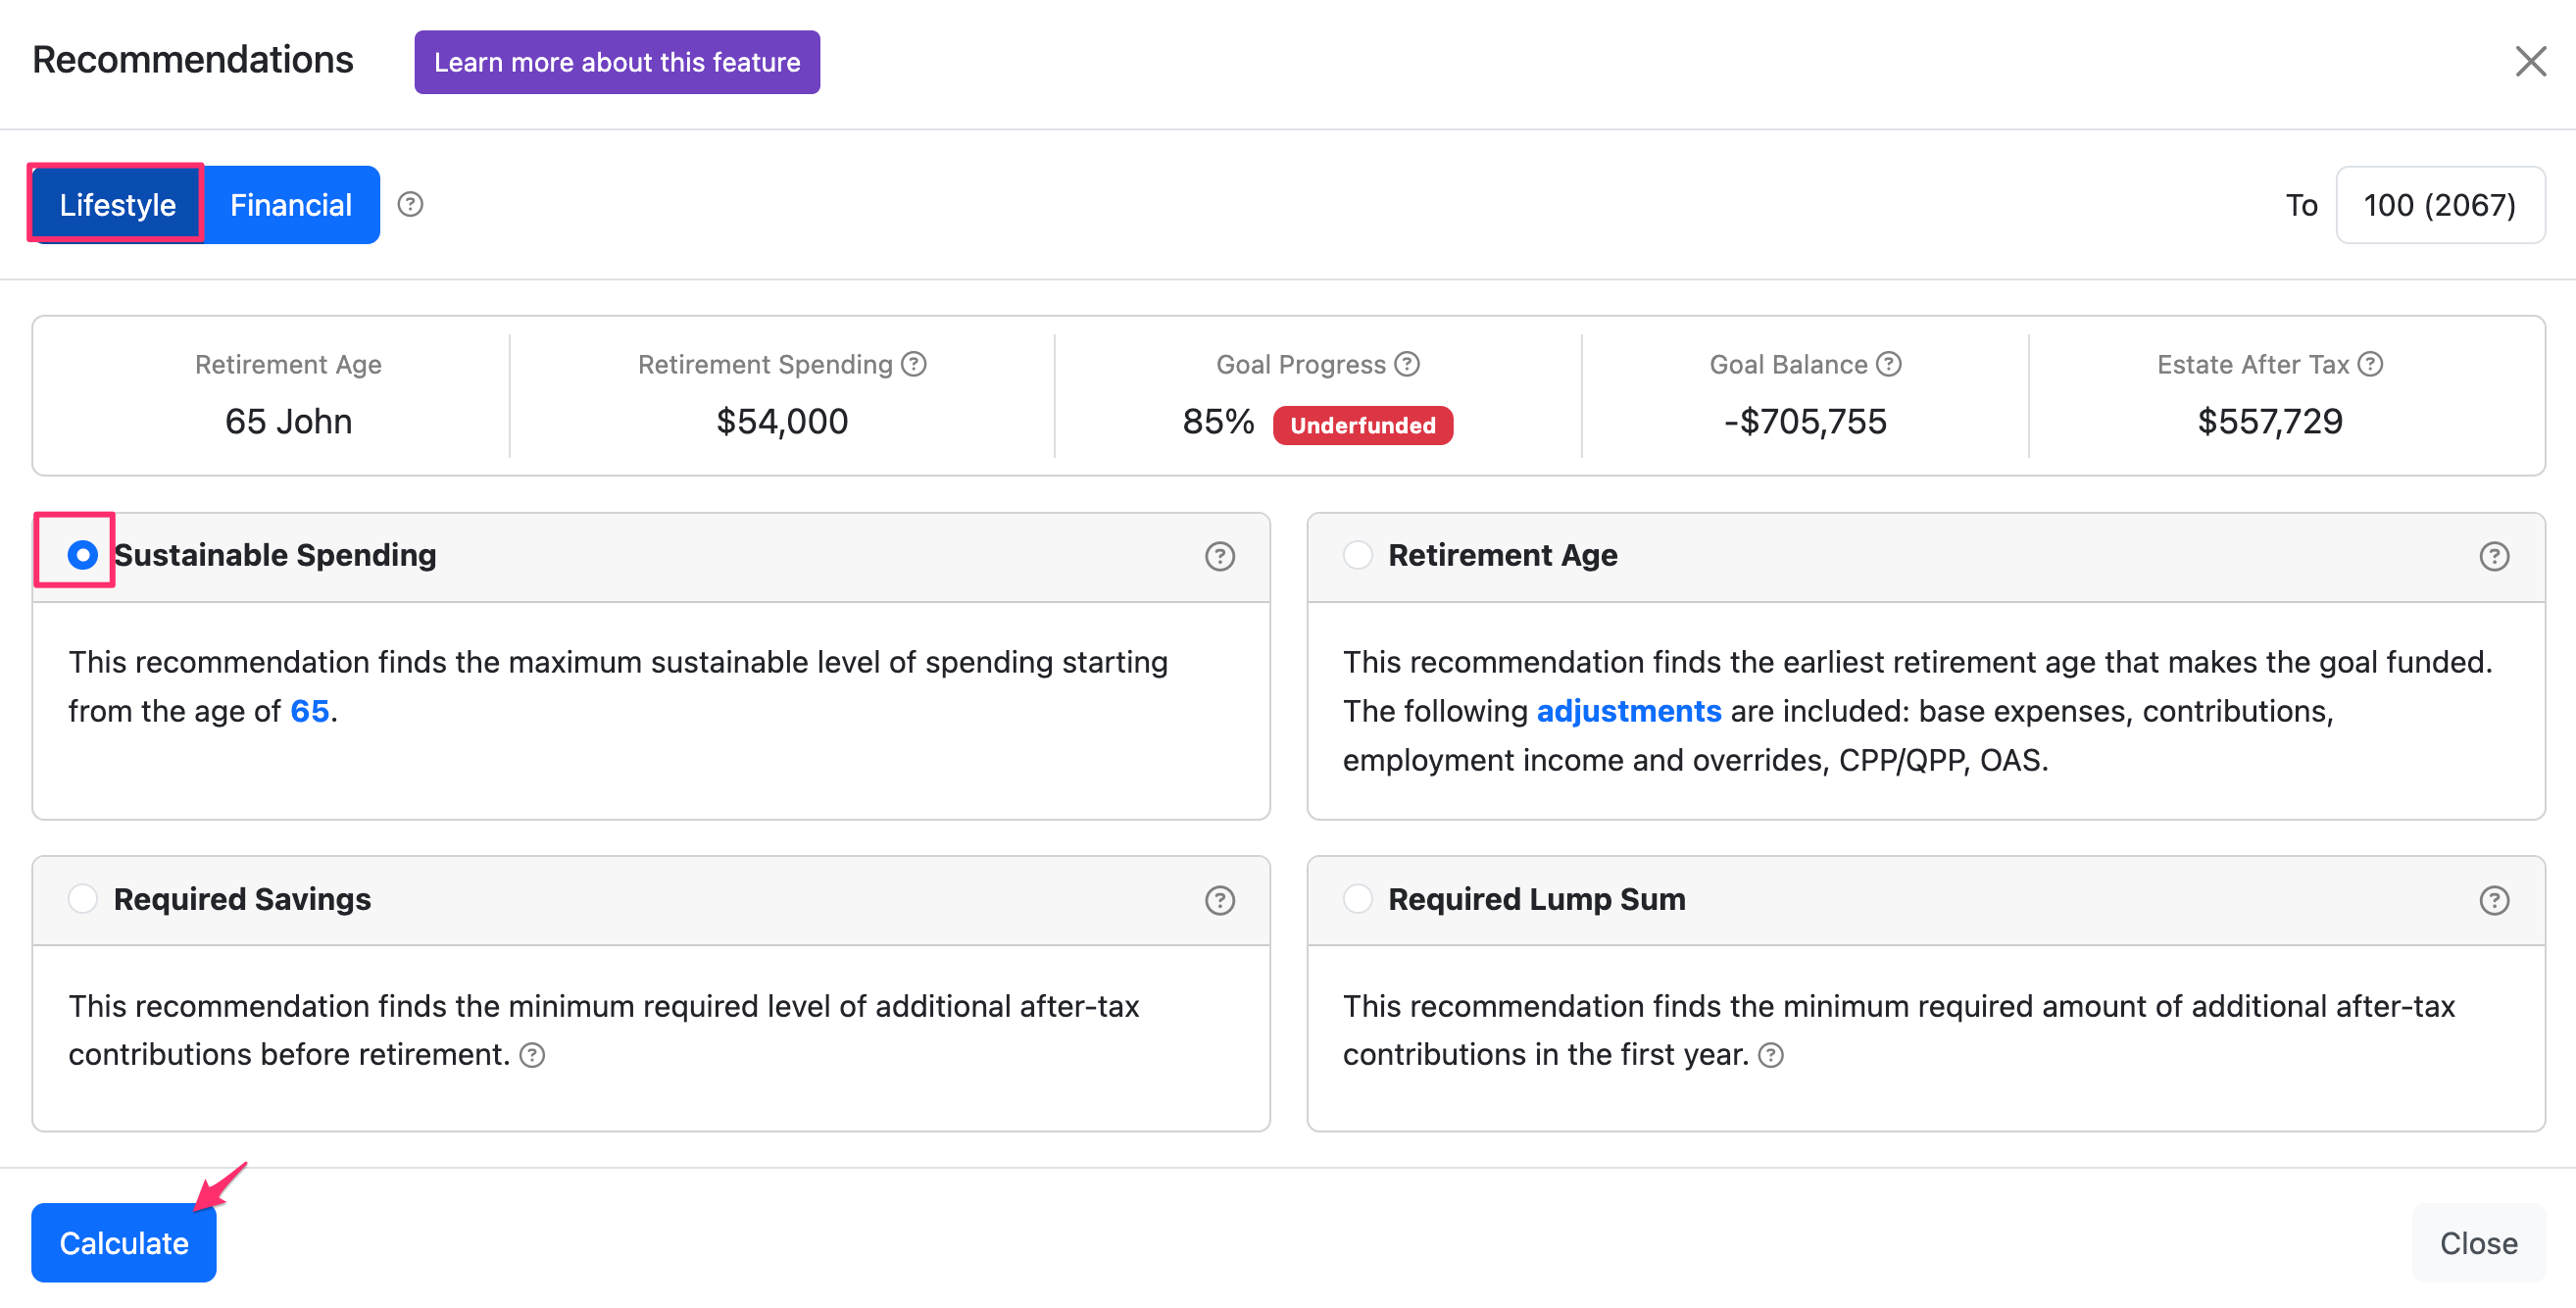
You can Calculate and see the adjustment that would be required and then decide if you'd like to Apply & Run that option in the current plan or copy the results to a new scenario.
The Financial Recommendations feature automatically tests a range of possible strategies to help improve your client's outcomes. These recommendations include the optimal time to take CPP/QPP and OAS benefits, which accounts to withdraw from in retirement, and other options to maximize the client's Estate After Tax in a specified year.
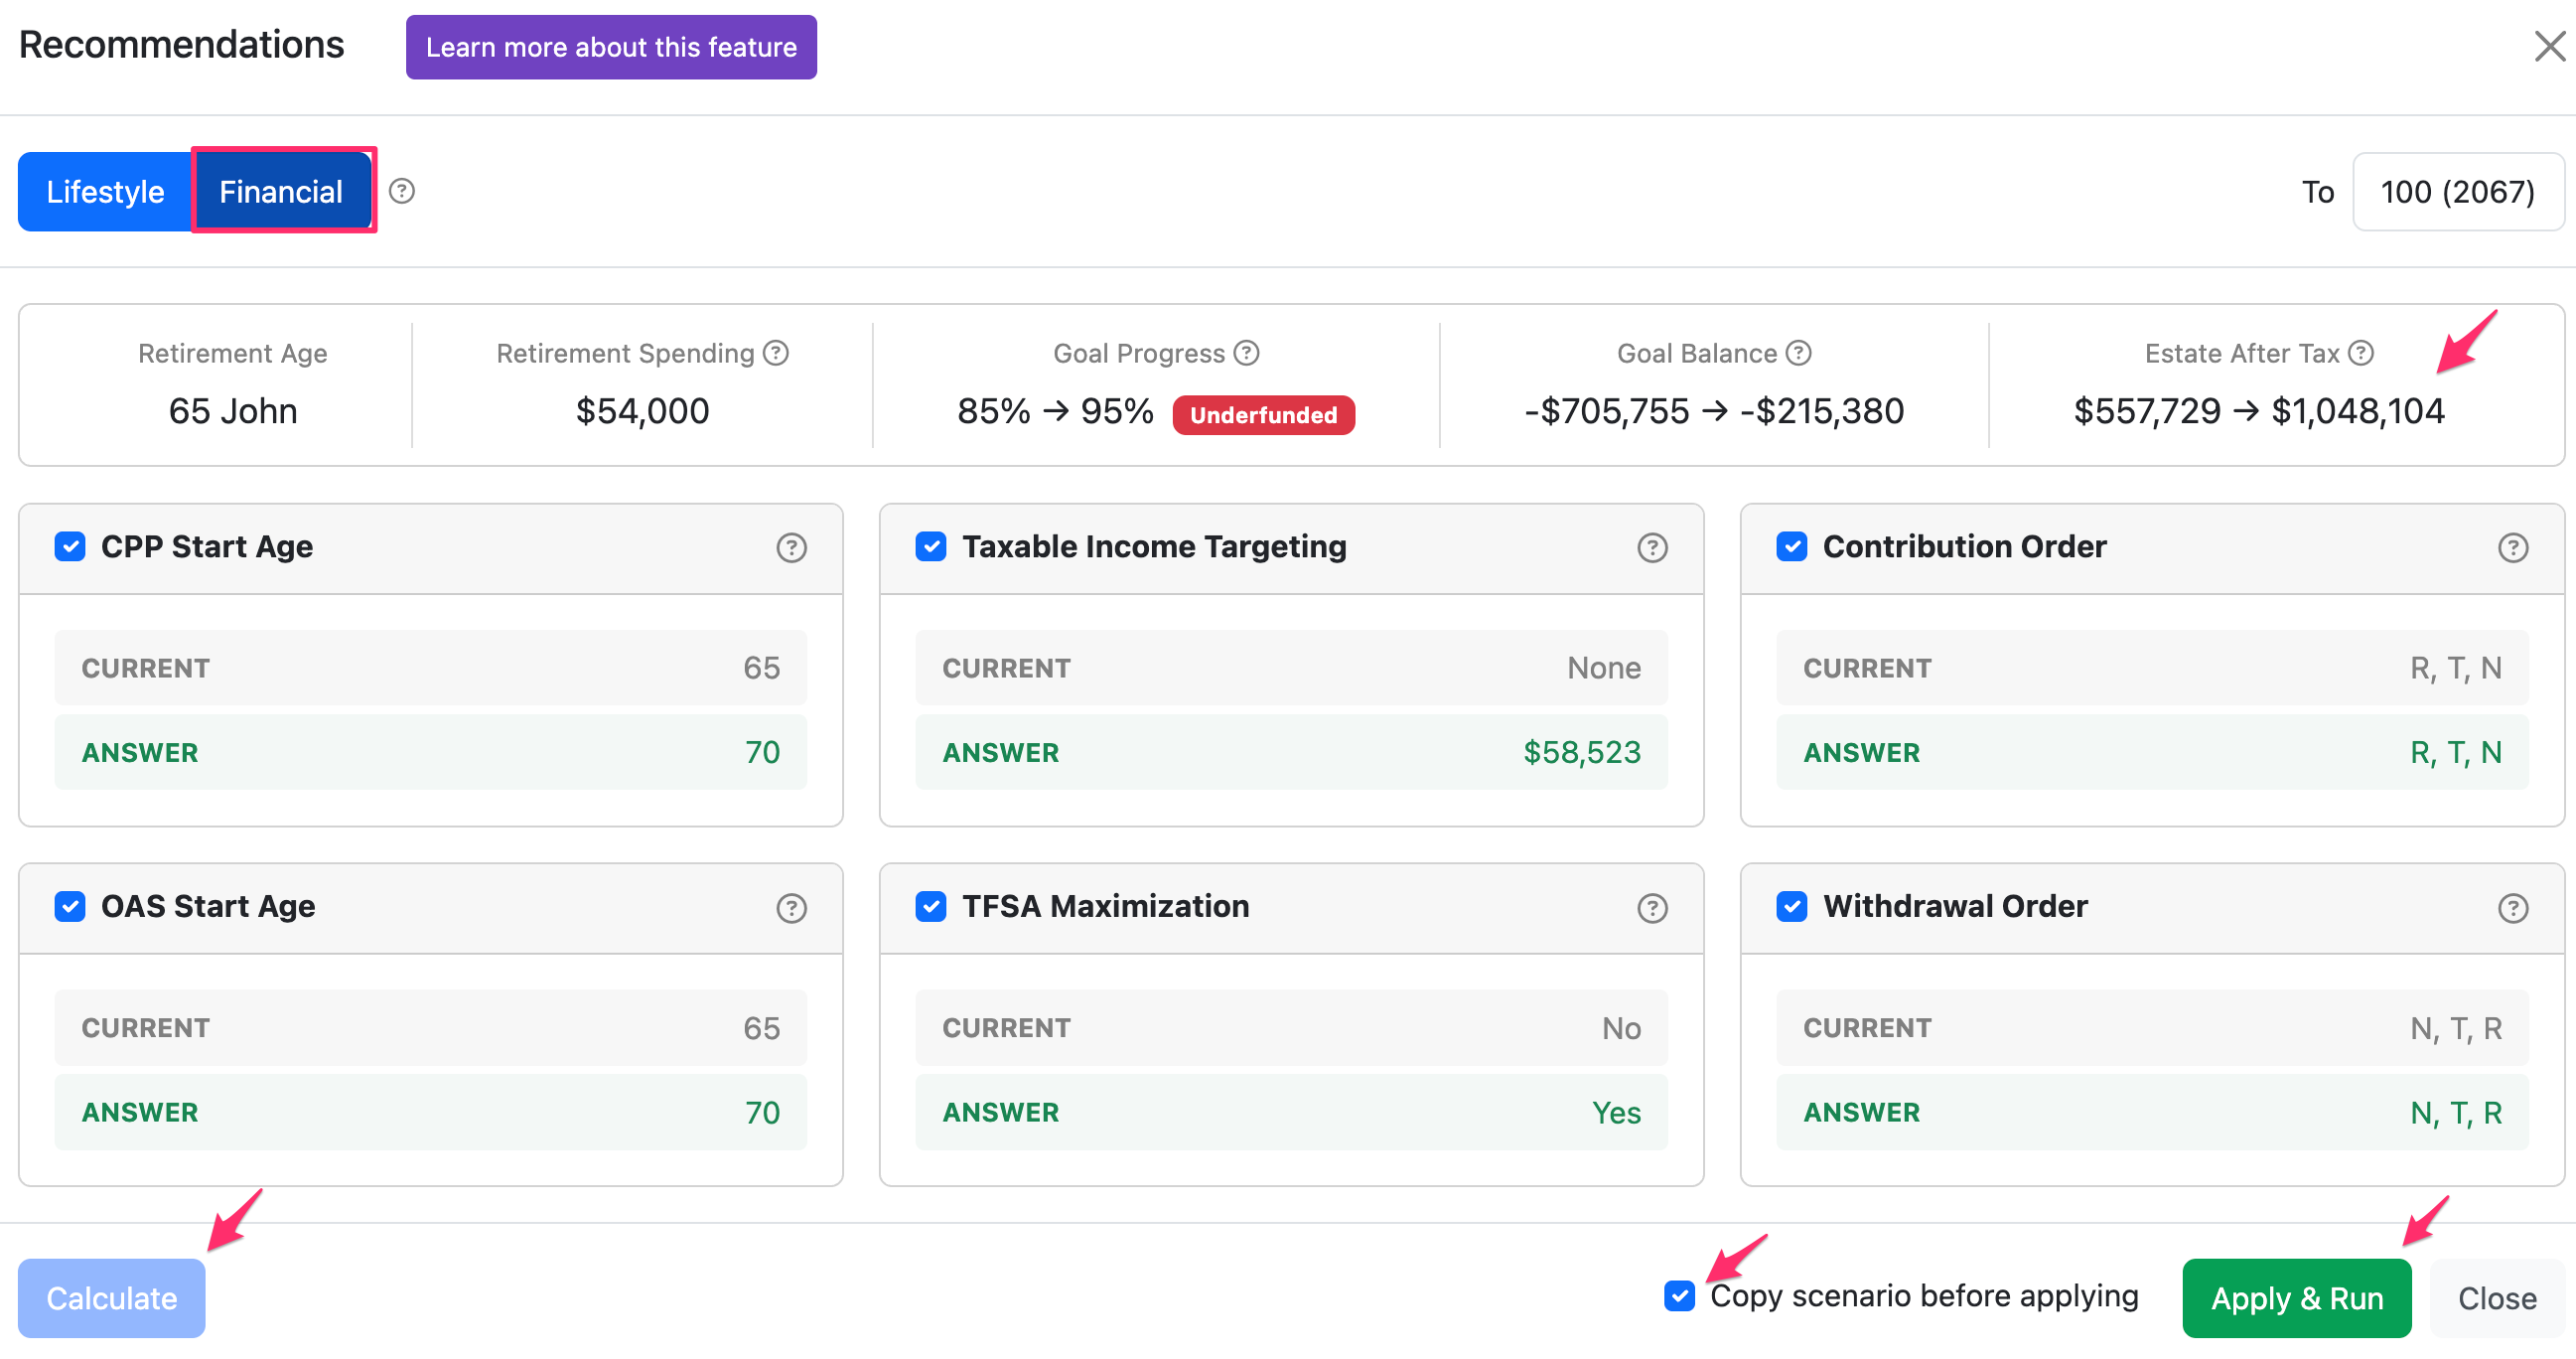
You can then choose to Apply & Run the changes on your current scenario, or create a copied version with the recommended strategies for comparison.
- 13
-
Review the Scenario
Scroll down on the scenario to review. Does the client run into a shortfall based on their Base Expenses and other expenses over time? A shortfall will be highlighted in pink in the scenario. Snap will automatically provide the client with a loan that is tracked under the Cash Balance column to allow them to keep up with their level of spending.

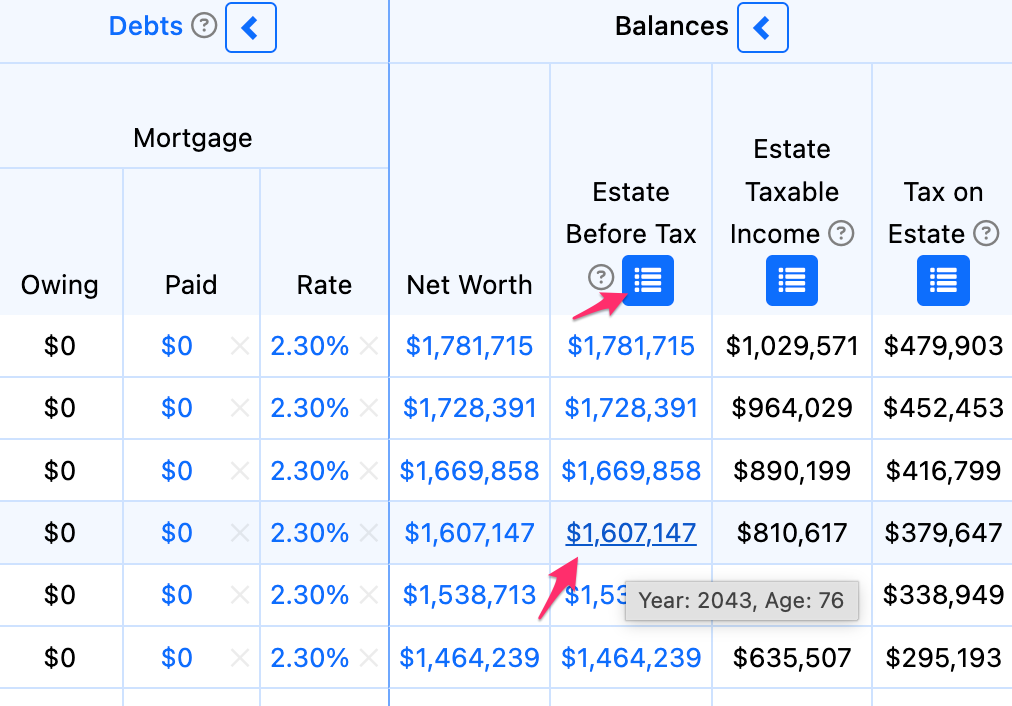
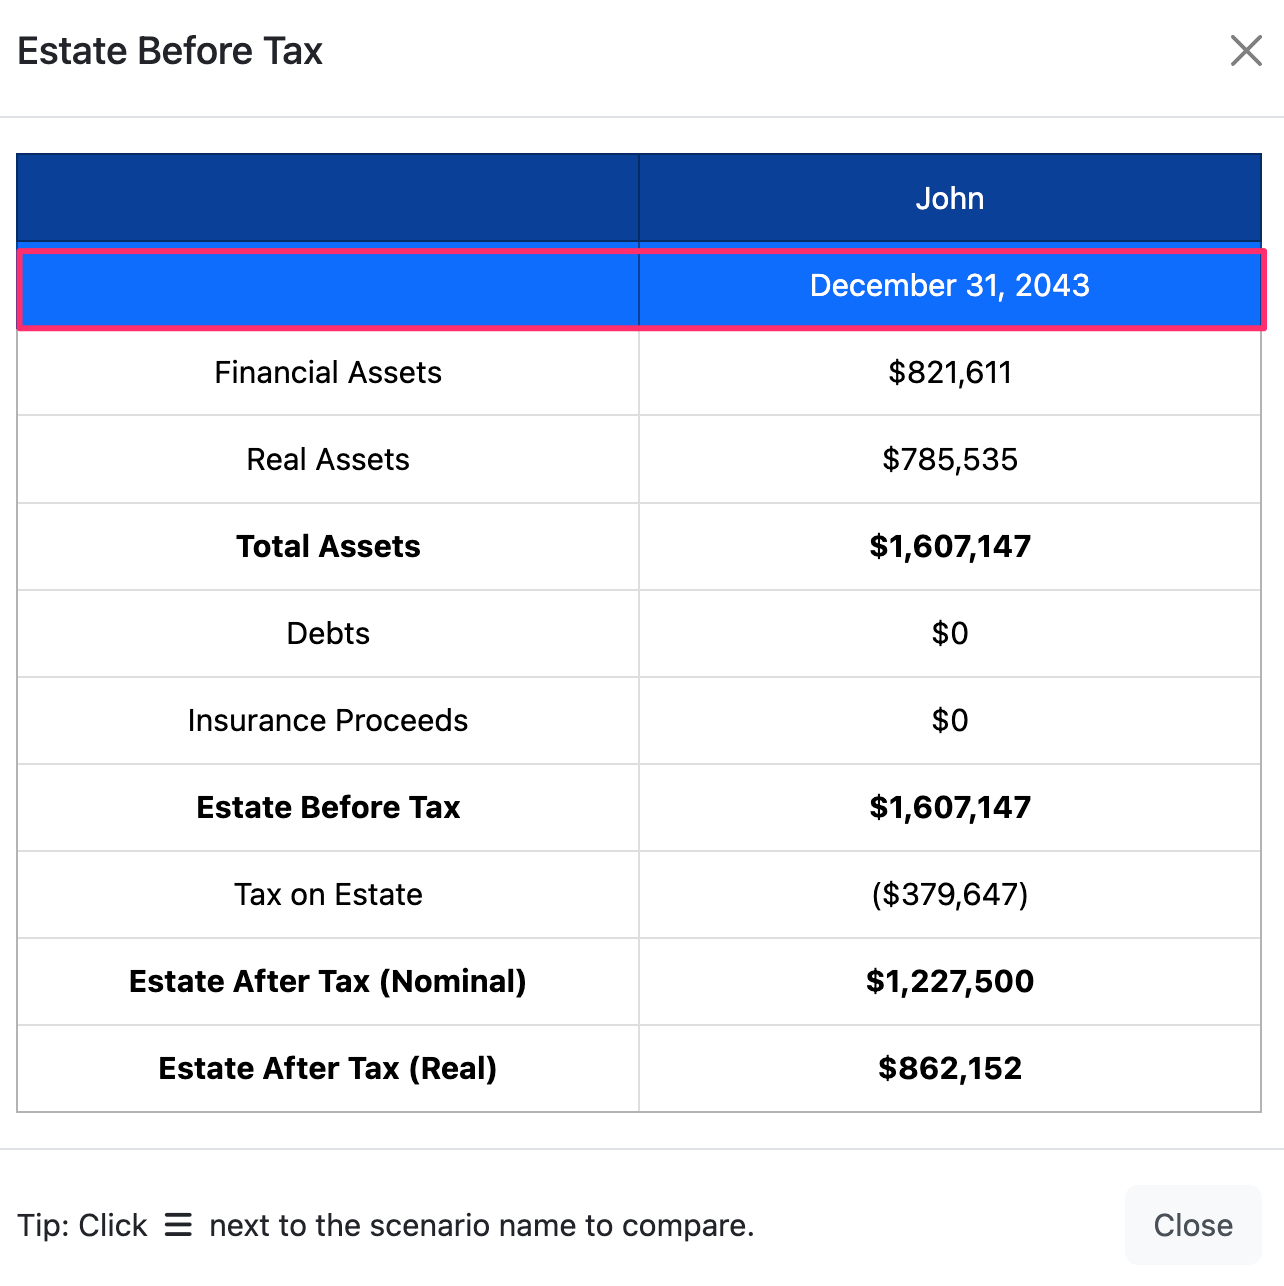
Alternatively, does the client reach the end of their projections with a positive estate? Review the Estate Summary by clicking the blue icon at the top of the Estate Before Tax column. This opens a detailed table with values displayed as of Dec. 31 of the final year of the projections. You can also click any value under the Estate Before Tax column to open that year's Estate Before Tax Summary table specifically. (For example, I could click $1,607,147 in the example to see the Summary at age 76 in 2043).
From here, you can begin to customize and modify your scenario. We created a handy checklist for your reference with reminders of areas to review. Here are a few more resources you may find helpful for your next steps.
- Copy scenarios and compare scenarios to illustrate different retirement options.
- Add an inheritance or any other lump sum amount.
- Show the sale of a real asset during the projections.
- Stress test the projections using Randomized or Historical Scenarios.
- Save and print the client report.